Network Attached Storage (NAS) 📀
First, please ask the administrator for a username and a password!
What is NAS for?
- Storing/sharing materials for research, e.g., datasets, codes, etc.
- Being linked to workstations for remote development.
DO NOT keep any sensitive information on NAS!
- Gaining Access To NAS
- Ask the administrator for a username and a password
- Change the password after the first login with web interface at https://223.195.240.67:1006
You might see a unsecured connection warning from your web browser when you try to access the NAS web interface. It is OK🙄 to ignore the warning and proceed to the website.
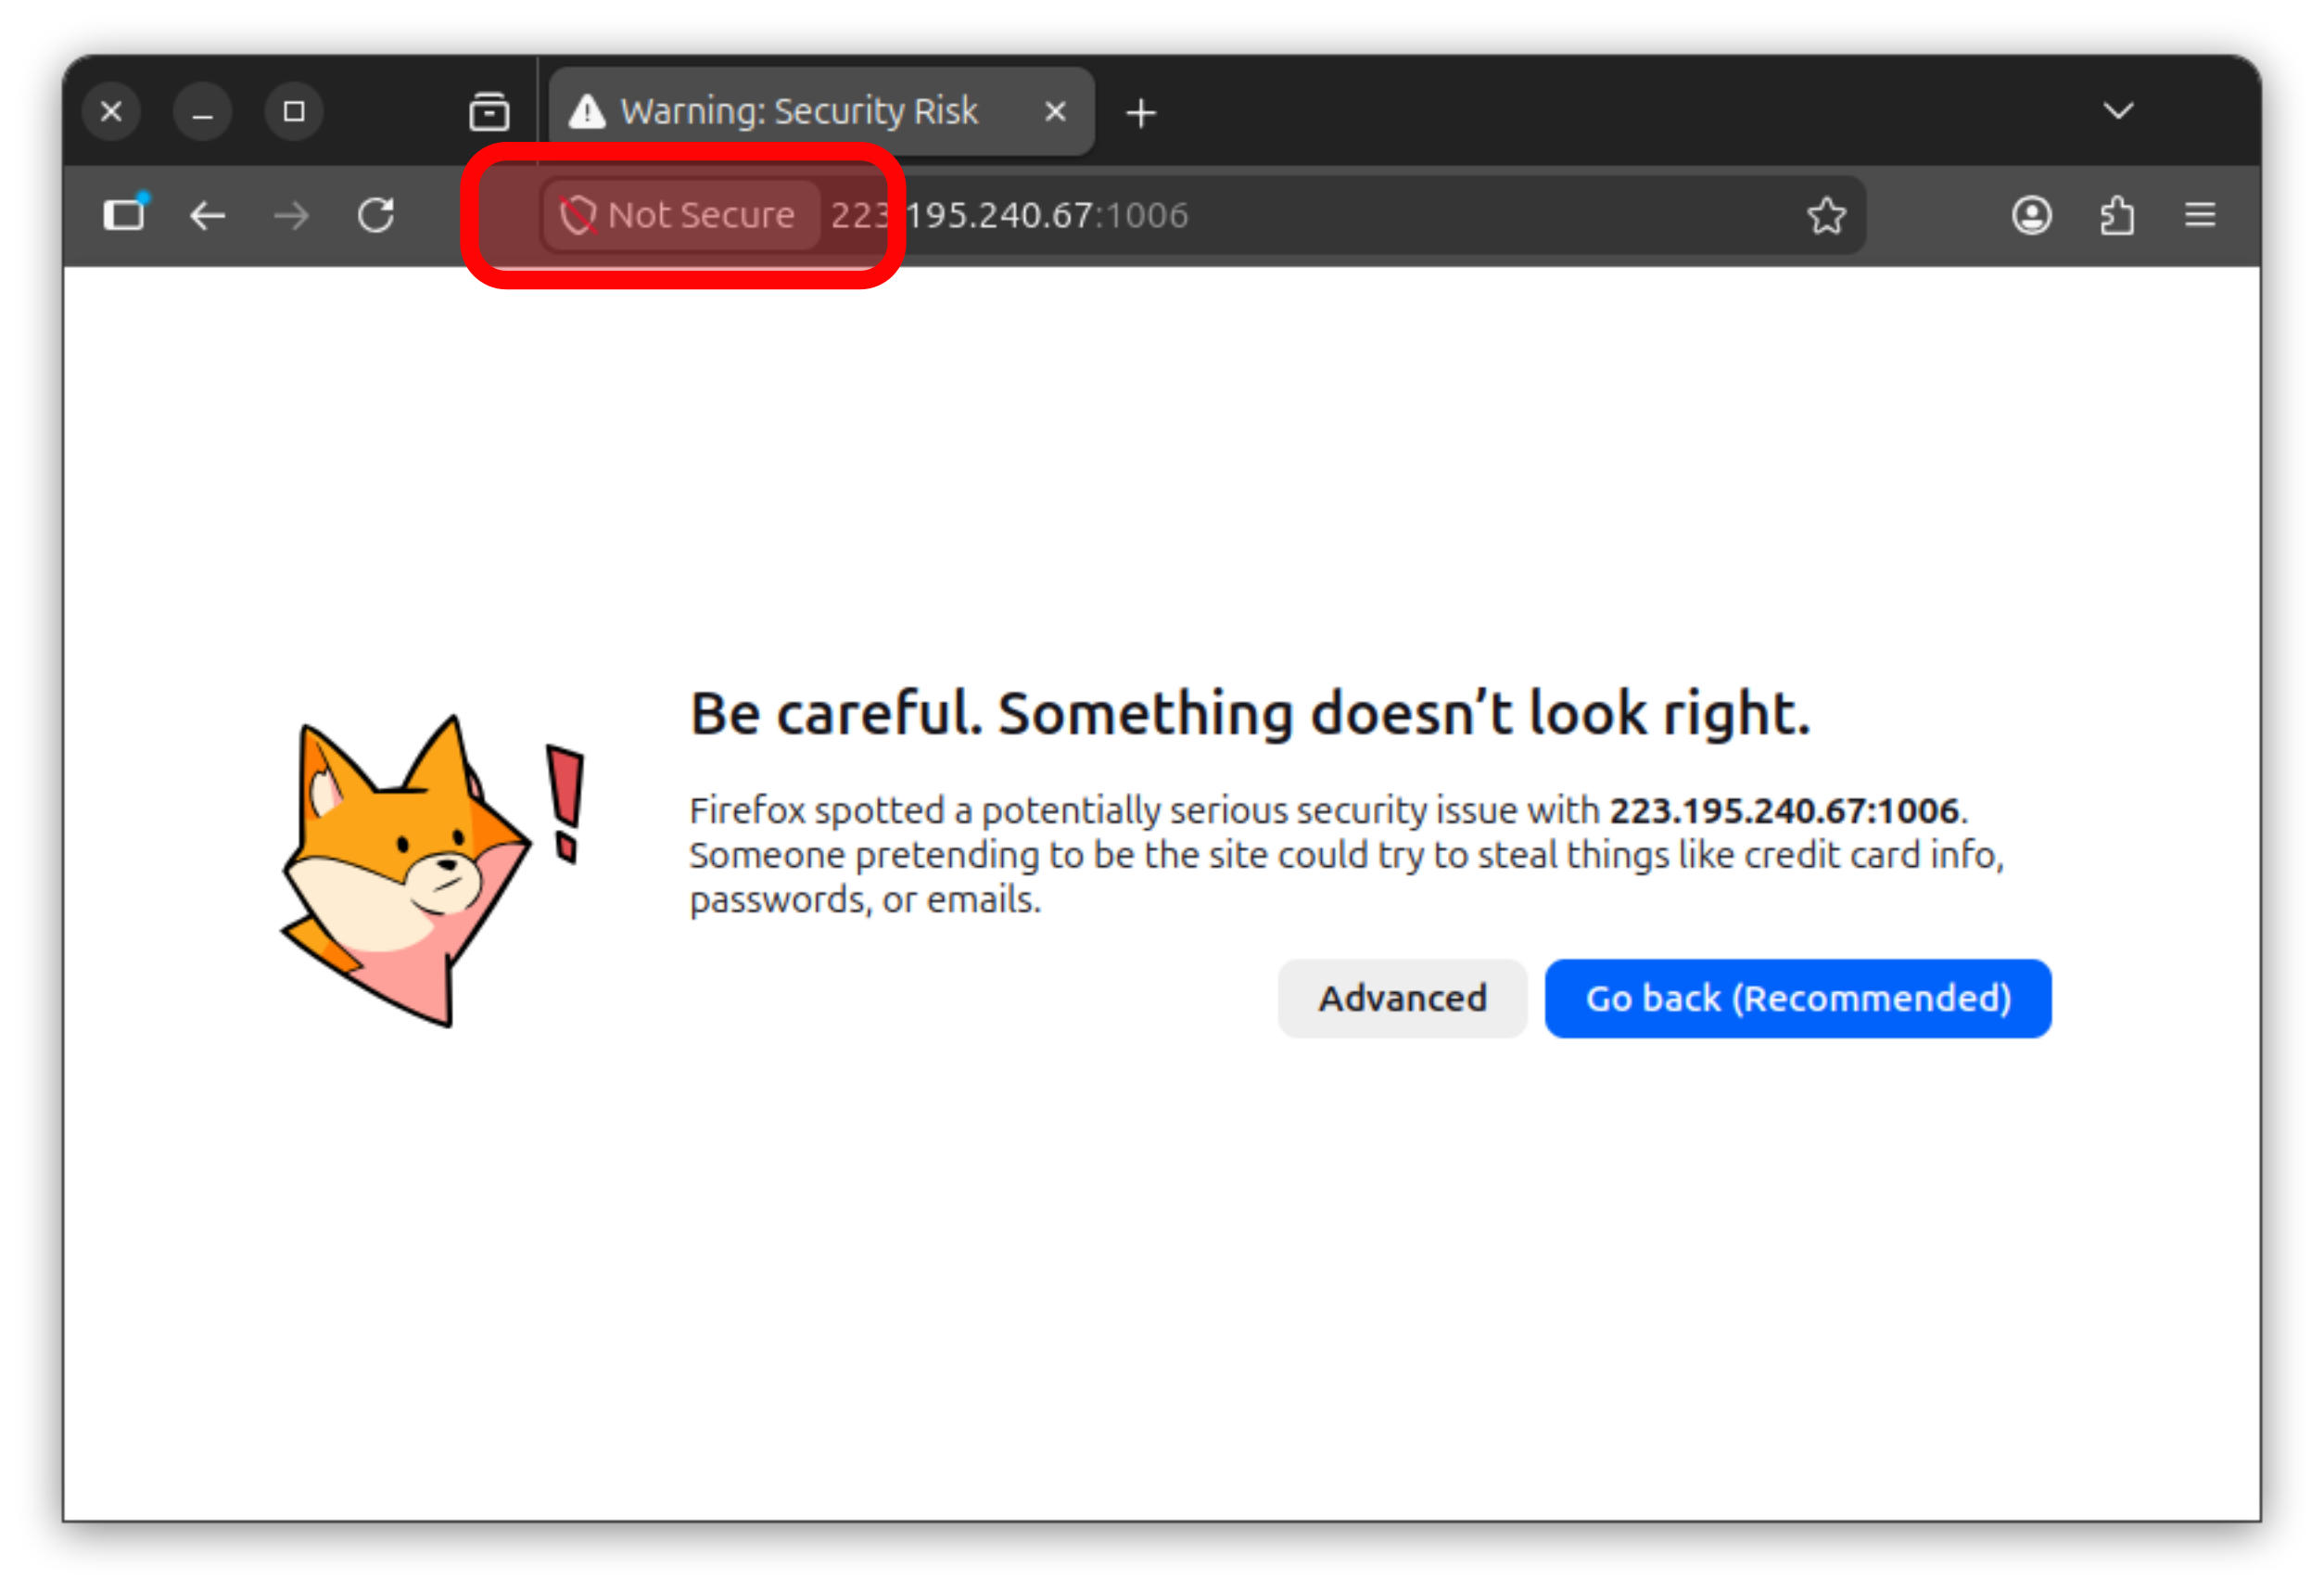
However, with an unsecured connection, your data, especially your username and password will be transmitted in plain text🤮. So, it is recommended to install a SSL certificate on your PC, especially if you are using a public network and you share the same username and password with other services.
To install a SSL certificate on you PC,
- Download the certificate.
- Install it on your PC. For Windows and Chrome, follow this instruction. For other operating systems and browsers, please search for the instructions online.
- Connecting To NAS
- NAS Web Interface
- Open a web browser and go to https://223.195.240.67:1006
- Enter your username and password
- Click [Sign In]
- NAS Web Interface main features include:
- [File Station] is for managing files and folders
- [Personal] contains your account information
- SFTP Clients
Please refer to Data Transfer 🚚 for more information
- NAS Web Interface
- NAS Folder Structure
- your_username contains your personal data.
- PAPER-WORK is for storing our lab’s documents.
- PUBLIC is for sharing materials from graduated members, this folder is read-only.
GPU Workstations
First, please ask the administrator for a username and a password!
SSH Keys 🔑
SSH keys are a pair of cryptographic keys used to authenticate a user to a remote server. Basically, you will need two keys:
- A
private keyis kept on your local machine at~/.ssh/id_XXX(Linux/MacOS) orC:\Users\your_username\.ssh\id_XXX(Windows) - A
public keyis stored on workstations at~/.ssh/authorized_keys
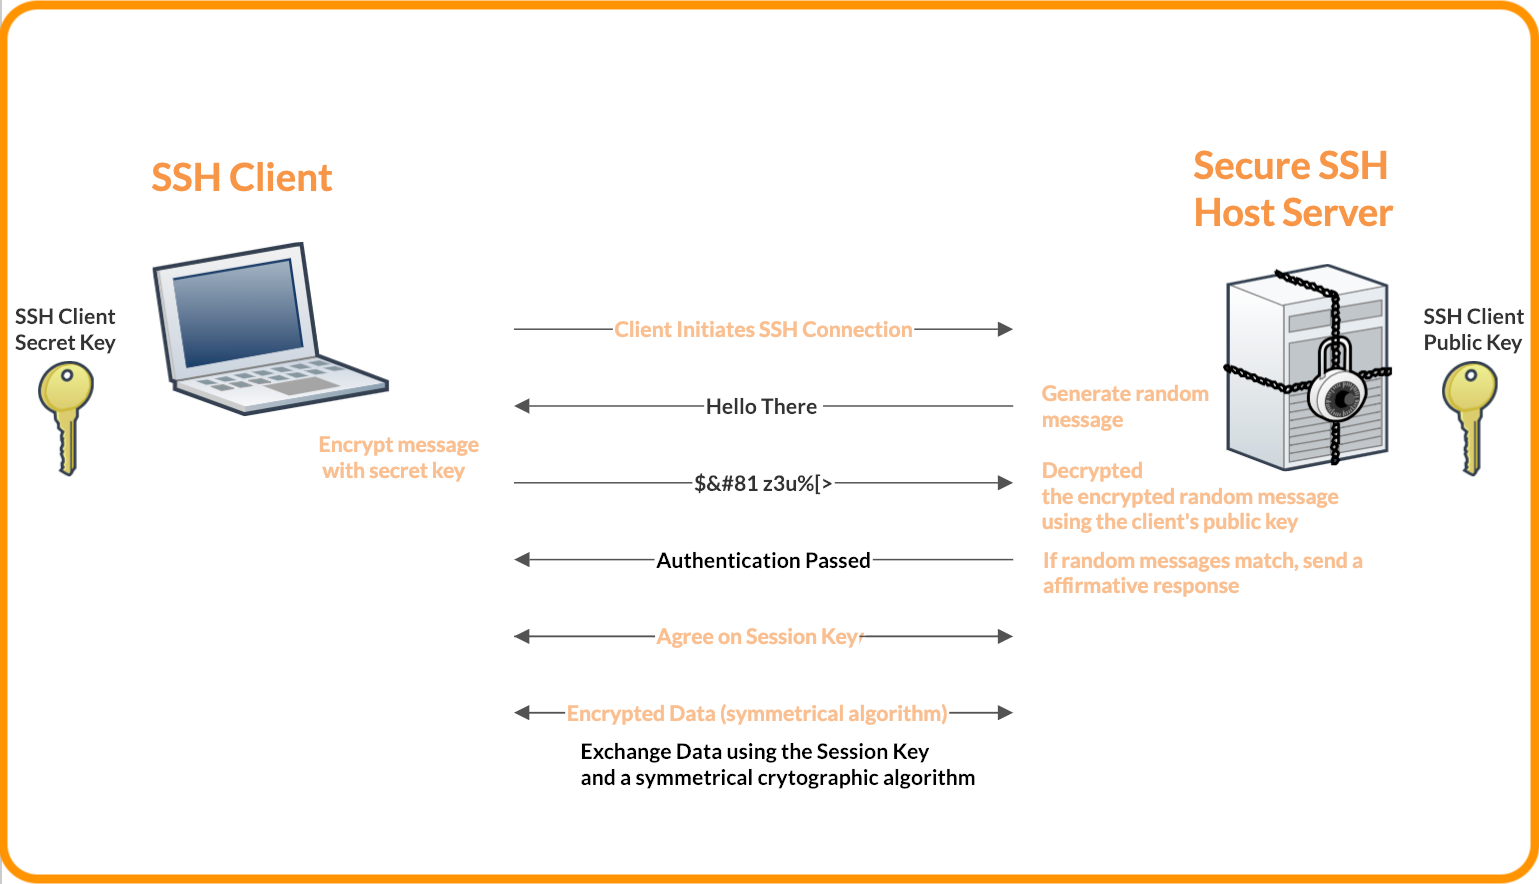
Instead of entering your password every time you connect to a workstation, your PC and workstations exchange encrypted messages via private key and public key. This way, you can log in without entering a password. This is more secure and convenient.
To set up SSH keys, follow these steps:
Generate SSH keys
This step should be done ONLY ONE TIME!
- Open a terminal on your local machine
- Run the following command to generate a new SSH key pairwhere
ssh-keygen -t ed25519 -C "your_comment"your_commentis any text you want, for example,cilab- You will be asked to enter a file name to save the key pair. Press
Enterto use the default file name~/.ssh/id_ed25519(Linux/MacOS) orC:\Users\your_username\.ssh\id_ed25519(Windows) - Next, you will be prompted to enter a passphrase to protect the keys. You can leave it empty by pressing
Enteror type a passphrase for added security. I personally leave it empty but please choose what you feel comfortable with. - After that, your SSH key pair will be generated in the
~/.sshdirectory (Linux/MacOS) orC:\Users\your_username\.ssh(Windows) on your local machine:private keyis saved asid_ed25519public keyis saved asid_ed25519.pub
- You will be asked to enter a file name to save the key pair. Press
Add the SSH key to the SSH agent
This step should be done ONLY ONE TIME!
Start the SSH agent
- For Linux and macOS, from the terminal in local machine,
eval "$(ssh-agent -s)" - For Windows,
- Open
Servicesby following one of these methods- Option 1: Press
Windows + Rto open the Run dialog, typeservice.mscand pressEnter - Option 2: Press
Start Menu, typeservicesand pressEnter
- Option 1: Press
- Look for
OpenSSH Authentication Agentin the list - Double-click on it to open its properties
- Set the
Startup typetoAutomatic - Press
Apply - Press
Startto start the service - Press
OKto close the properties window
- Open
- For Linux and macOS, from the terminal in local machine,
Add the SSH key to the agent, open a terminal on your local machine and run the following command:
- For Linux and macOS,
ssh-add ~/.ssh/id_ed25519 - For Windows,
ssh-add C:\Users\your_username\.ssh\id_ed25519
- For Linux and macOS,
Copy the
public keyto the workstationsDo the following steps for ALL the workstations!
- Open the
public keyfileid_ed25519.pubon your local machine using Notepad or any text editor - Copy its content. For example, it should look like this:
ssh-ed25519 AAAAC3Nza... your_comment - Open a terminal on your local machine
- Login to a workstation using SSH
ssh your_username@workstation_ip_address -p 1004 - Create the
~/.sshdirectory if it does not existmkdir -p ~/.ssh - Paste the content into the
~/.ssh/authorized_keysfile on the workstationreplaceecho "ssh-ed25519 AAAAC3Nza... your_comment" >> ~/.ssh/authorized_keysssh-ed25519 AAAAC3Nza... your_commentwith the actual content of yourpublic keyfile. - Set the correct permissions for the
~/.sshdirectory and theauthorized_keysfile so that only you can read and write to themchmod 700 ~/.ssh chmod 600 ~/.ssh/authorized_keys - Exit the workstation
exit
- Open the
- Test the connection
- Open a terminal on your local machine
- Run the following command to test the SSH connectionIf everything is set up correctly, you should be able to log in to the workstation without entering a password! This is also applied when you use VSCode to connect to workstations.
ssh your_username@workstation_ip_address -p 1004
In summary,
- Local machines:
- A
private keyfile at~/.ssh/id_ed25519(Linux/MacOS) orC:\Users\your_username\.ssh\id_ed25519(Windows)- Adding the
private keyto the SSH agent- Workstations: a
public keyat~/.ssh/authorized_keys
Notes:
- After entering
ssh your_username@workstation_ip_address -p 1004, if you are asked to enter your password, it means that the SSH key authentication is NOT set up correctly. Leave a message in our KakaoTalk group for help!- NO NOT share your
private key~/.ssh/id_ed25519orC:\Users\your_username\.ssh\id_ed25519with anyone. You can think of it as your password!- If you have any issue with
REMOTE HOST IDENTIFICATION HAS CHANGEDand errors related to.ssh/known_hosts, please remove the corresponding line in the~/.ssh/known_hostsfile on your local machine or simply delete~/.ssh/known_hostsif you are comfortable doing so.- If you want to use the same SSH key on multiple workstations and multiple local machines, you can copy the
public keyto all the workstations using the step 2 above andprivate keyto all your local machines.
Basic Usage 🖥️
Connecting To Workstations 🖥️
Let’s start with the most common way to connect to a workstation, which is using SSH with a terminal.
- Open a terminal
- Connect to the workstation with the following command
ssh username@workstation_ip -p 1004 - If you ssh key authentication is set up correctly, you should be able to connect to the workstation without entering a password. Otherwise, follow the above instructions to make ssh key again!
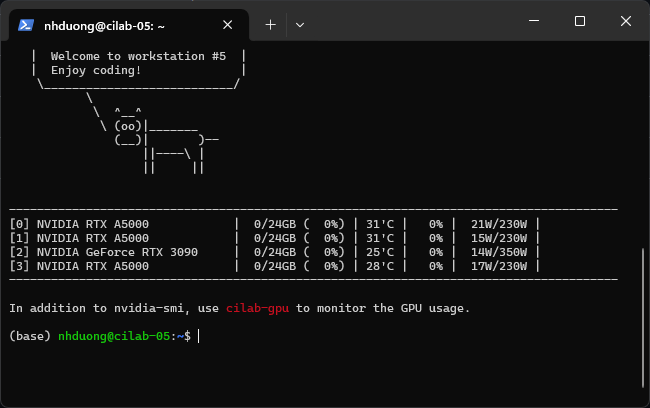
- You are now connected to the workstation
Environment Setup 🚧
For the most part, you will be working on GPU workstations with Python based projects. Here is an example of how to set up your Python environment:
- Connect to the workstation with SSH
- Install Anaconda
- Download the latest version of Anaconda for Linux, for example, Anaconda3-2024.10-1-Linux-x86_64.sh
wget https://repo.anaconda.com/archive/Anaconda3-2024.10-1-Linux-x86_64.sh - Enter the following command to install Anacondathen follow the instructions to complete the installation.
bash Anaconda3-2024.10-1-Linux-x86_64.sh - Create a new environment with Python 3.9Replace
conda create -n <your environment name here> python=3.9<your environment name here>and3.9with any name and any version of Python that you need. - Activate the environmentYou should see the environment name in the terminal prompt which is
conda activate <your environment name here>(csd)in the figure below.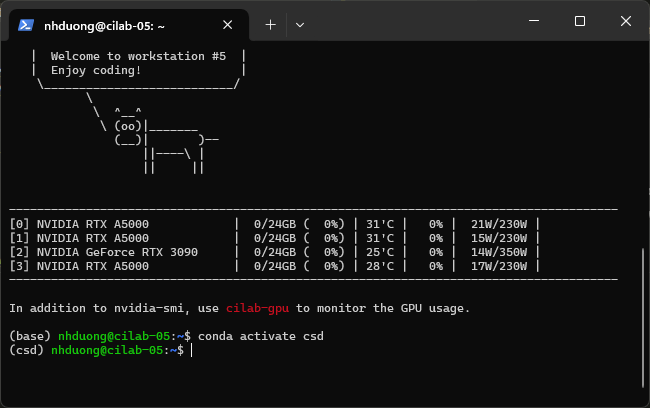
- Download the latest version of Anaconda for Linux, for example, Anaconda3-2024.10-1-Linux-x86_64.sh
- Hello World!
- Let’s start with a simple Python script
- Use
nanotext editor to create a Python scriptnano hello.py - Enter the following content
print("Hello, World!") - Save the file by pressing
Ctrl + Oand thenEnter - Close
nanoby pressingCtrl + X - Run the file with the following commandYou should see the output
python hello.pyHello, World!in the terminal!
Interacting With Workstations 🖥️
VSCode is an All-in-One powerful editor that runs on your local machine. It can be used to connect to a remote workstation for develpment. It comes with a lot of useful features via extensions. This guide will show you how to set up and use VSCode to connect to a CILab workstation.
Download and install VSCode on your local machine (NOT the workstation!)
Remember to make a reservation before using a workstation.
SSH configuration:
(skip this step if you have already done it before.)- Run VS Code on your local machine.
- Install the Remote-SSH extension in VSCode
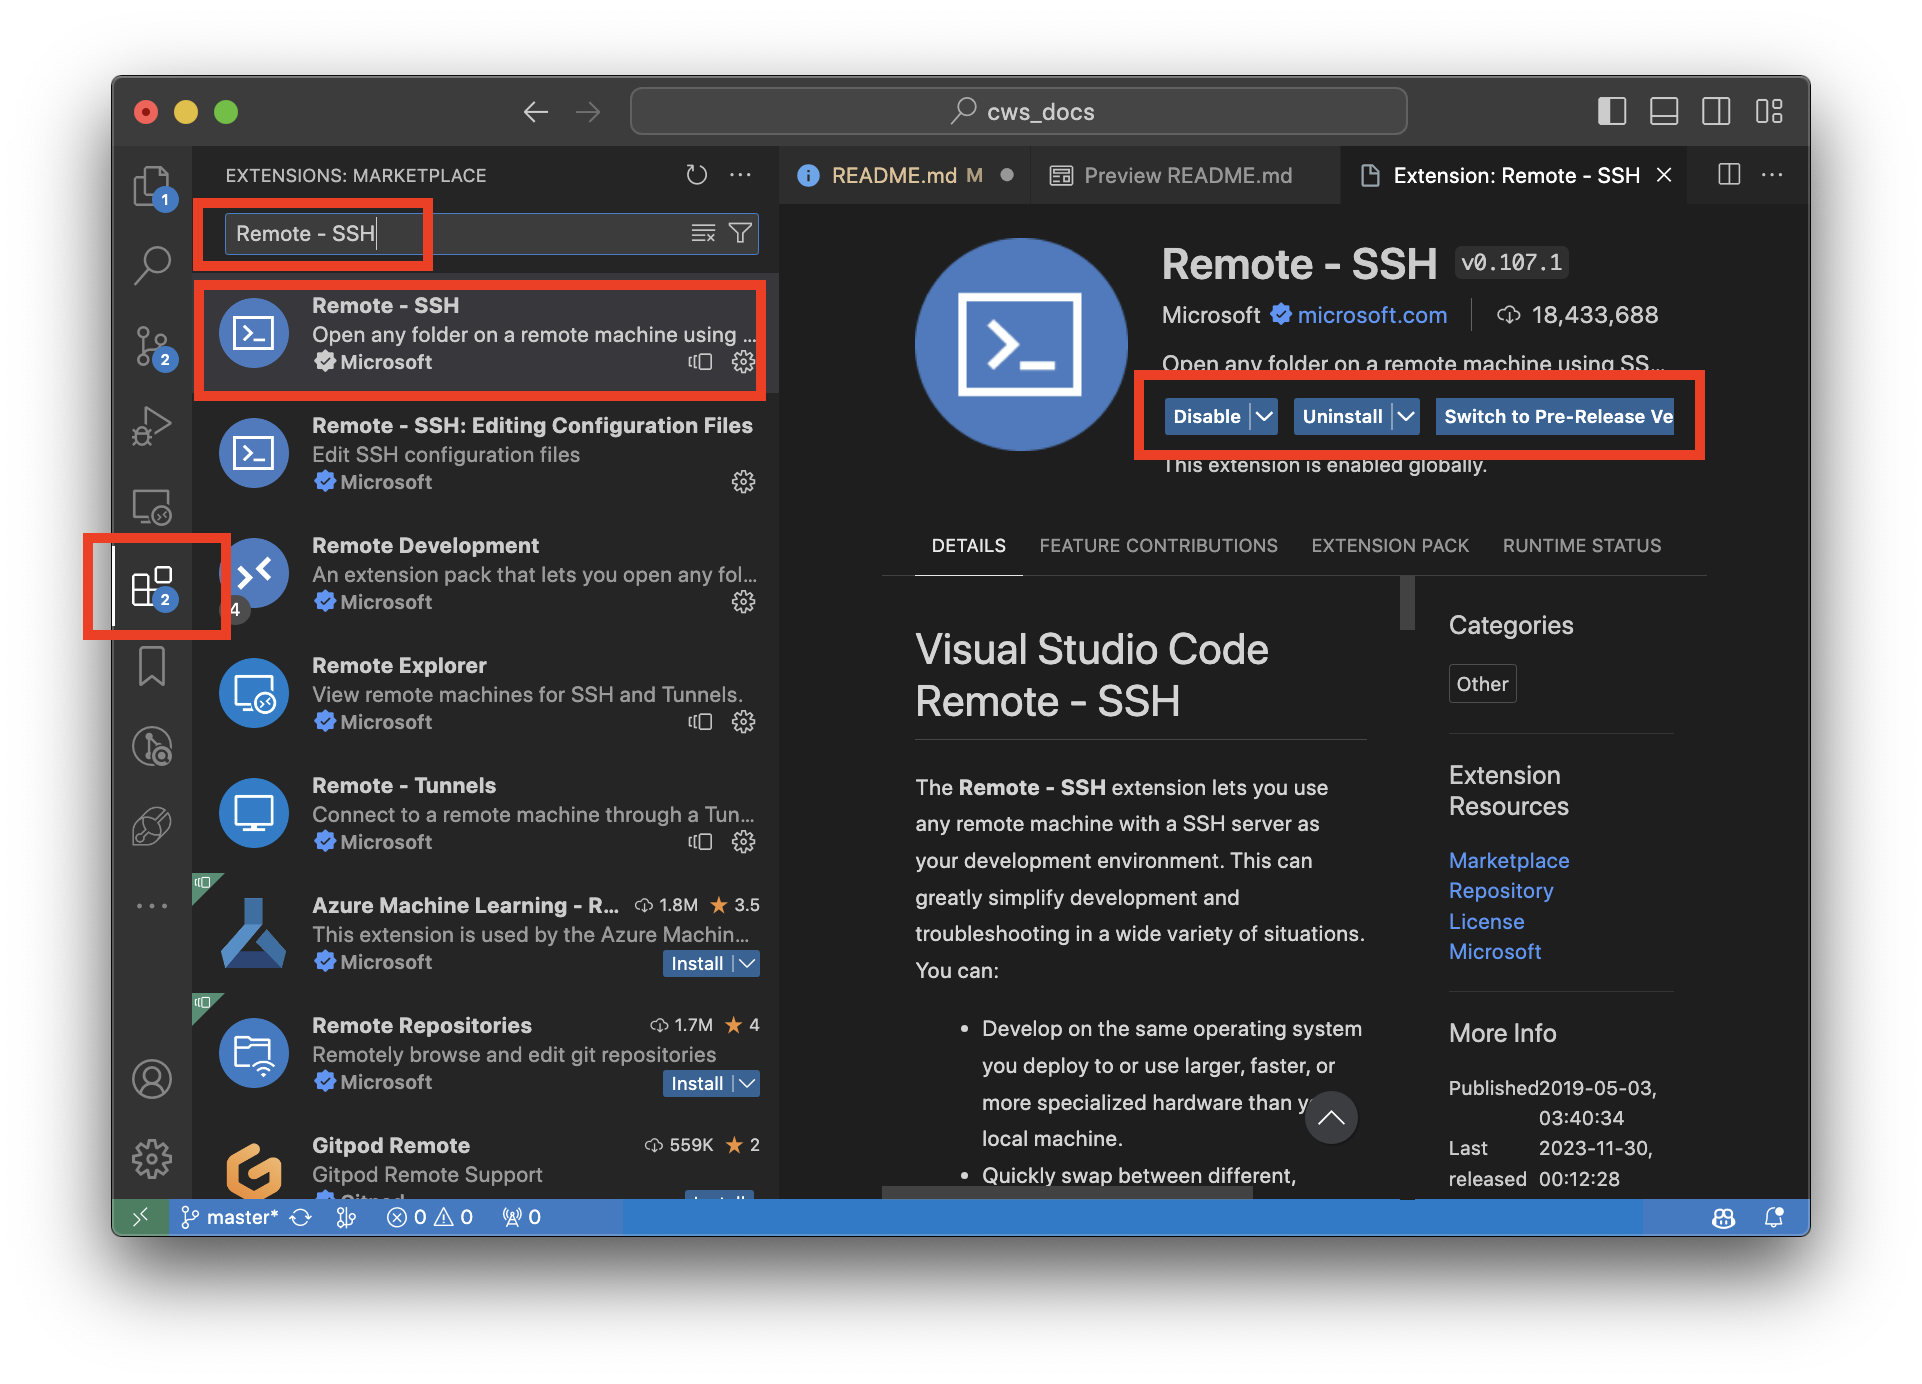
- Press
F1(Windows/Linux) or⇧⌘P(macOS) to openCommand Palette - Type
Remote-SSH: Open SSH Configuration File...and pressEnter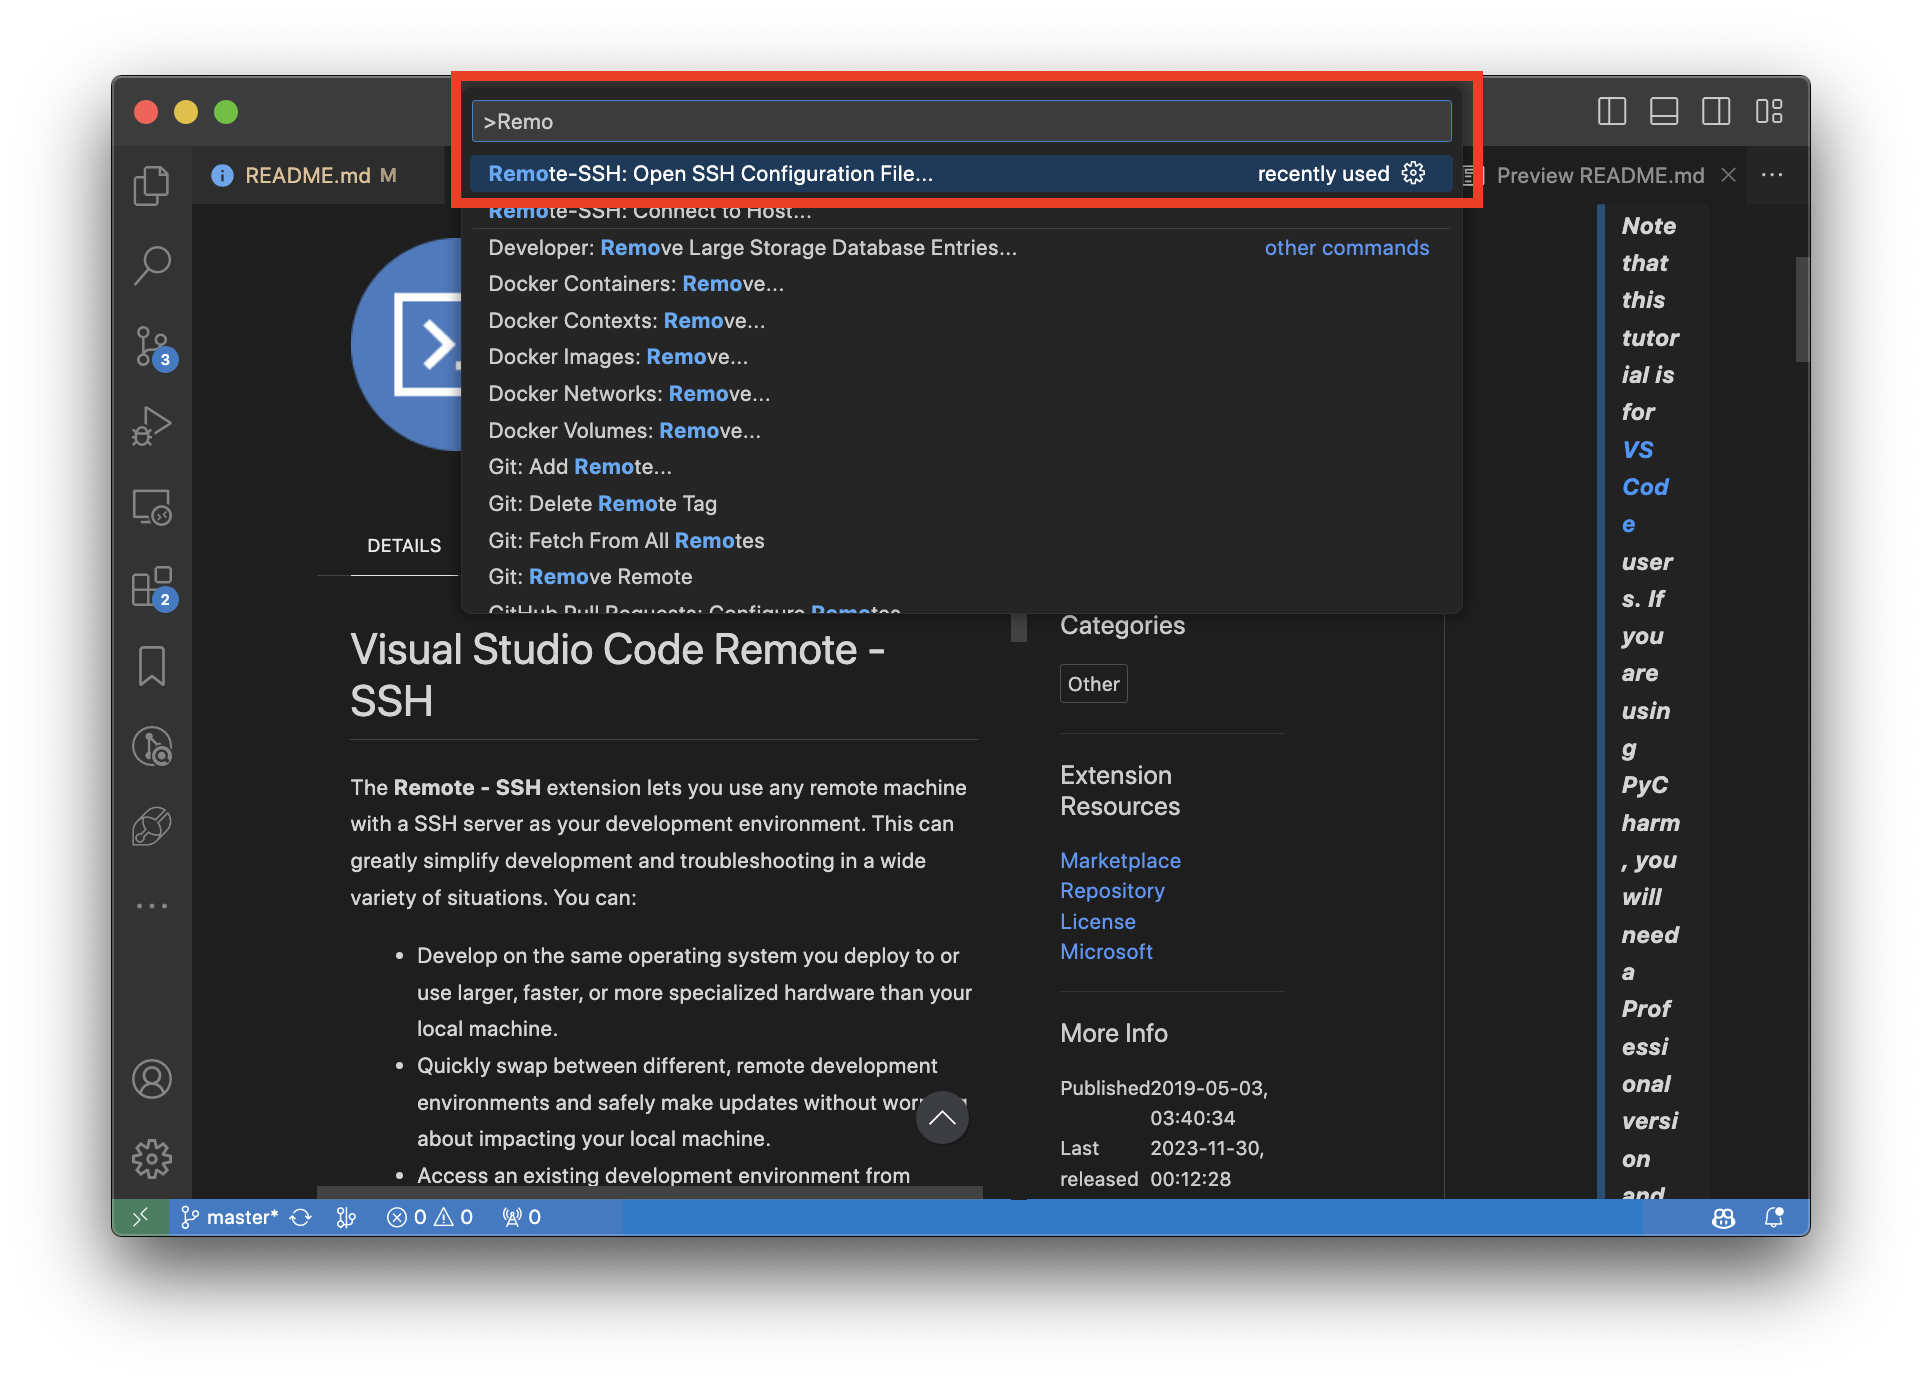
- Select:
- Linux:
~/.ssh/config - Windows:
C:\Users\your_username\.ssh\config - macOS:
/Users/your_username/.ssh/config
- Linux:
then press Enter.
- Add the following lines to the file:
Host any_name_you_like HostName workstation_ip_address User your_username Port 1004 - Save the file and close it.
Connecting to a server
- Run VS Code on your local machine (if you haven’t.)
- Press
F1(Windows/Linux) or⇧⌘P(macOS) to openCommand Palette - Type
Remote-SSH: Connect to Host...and pressEnter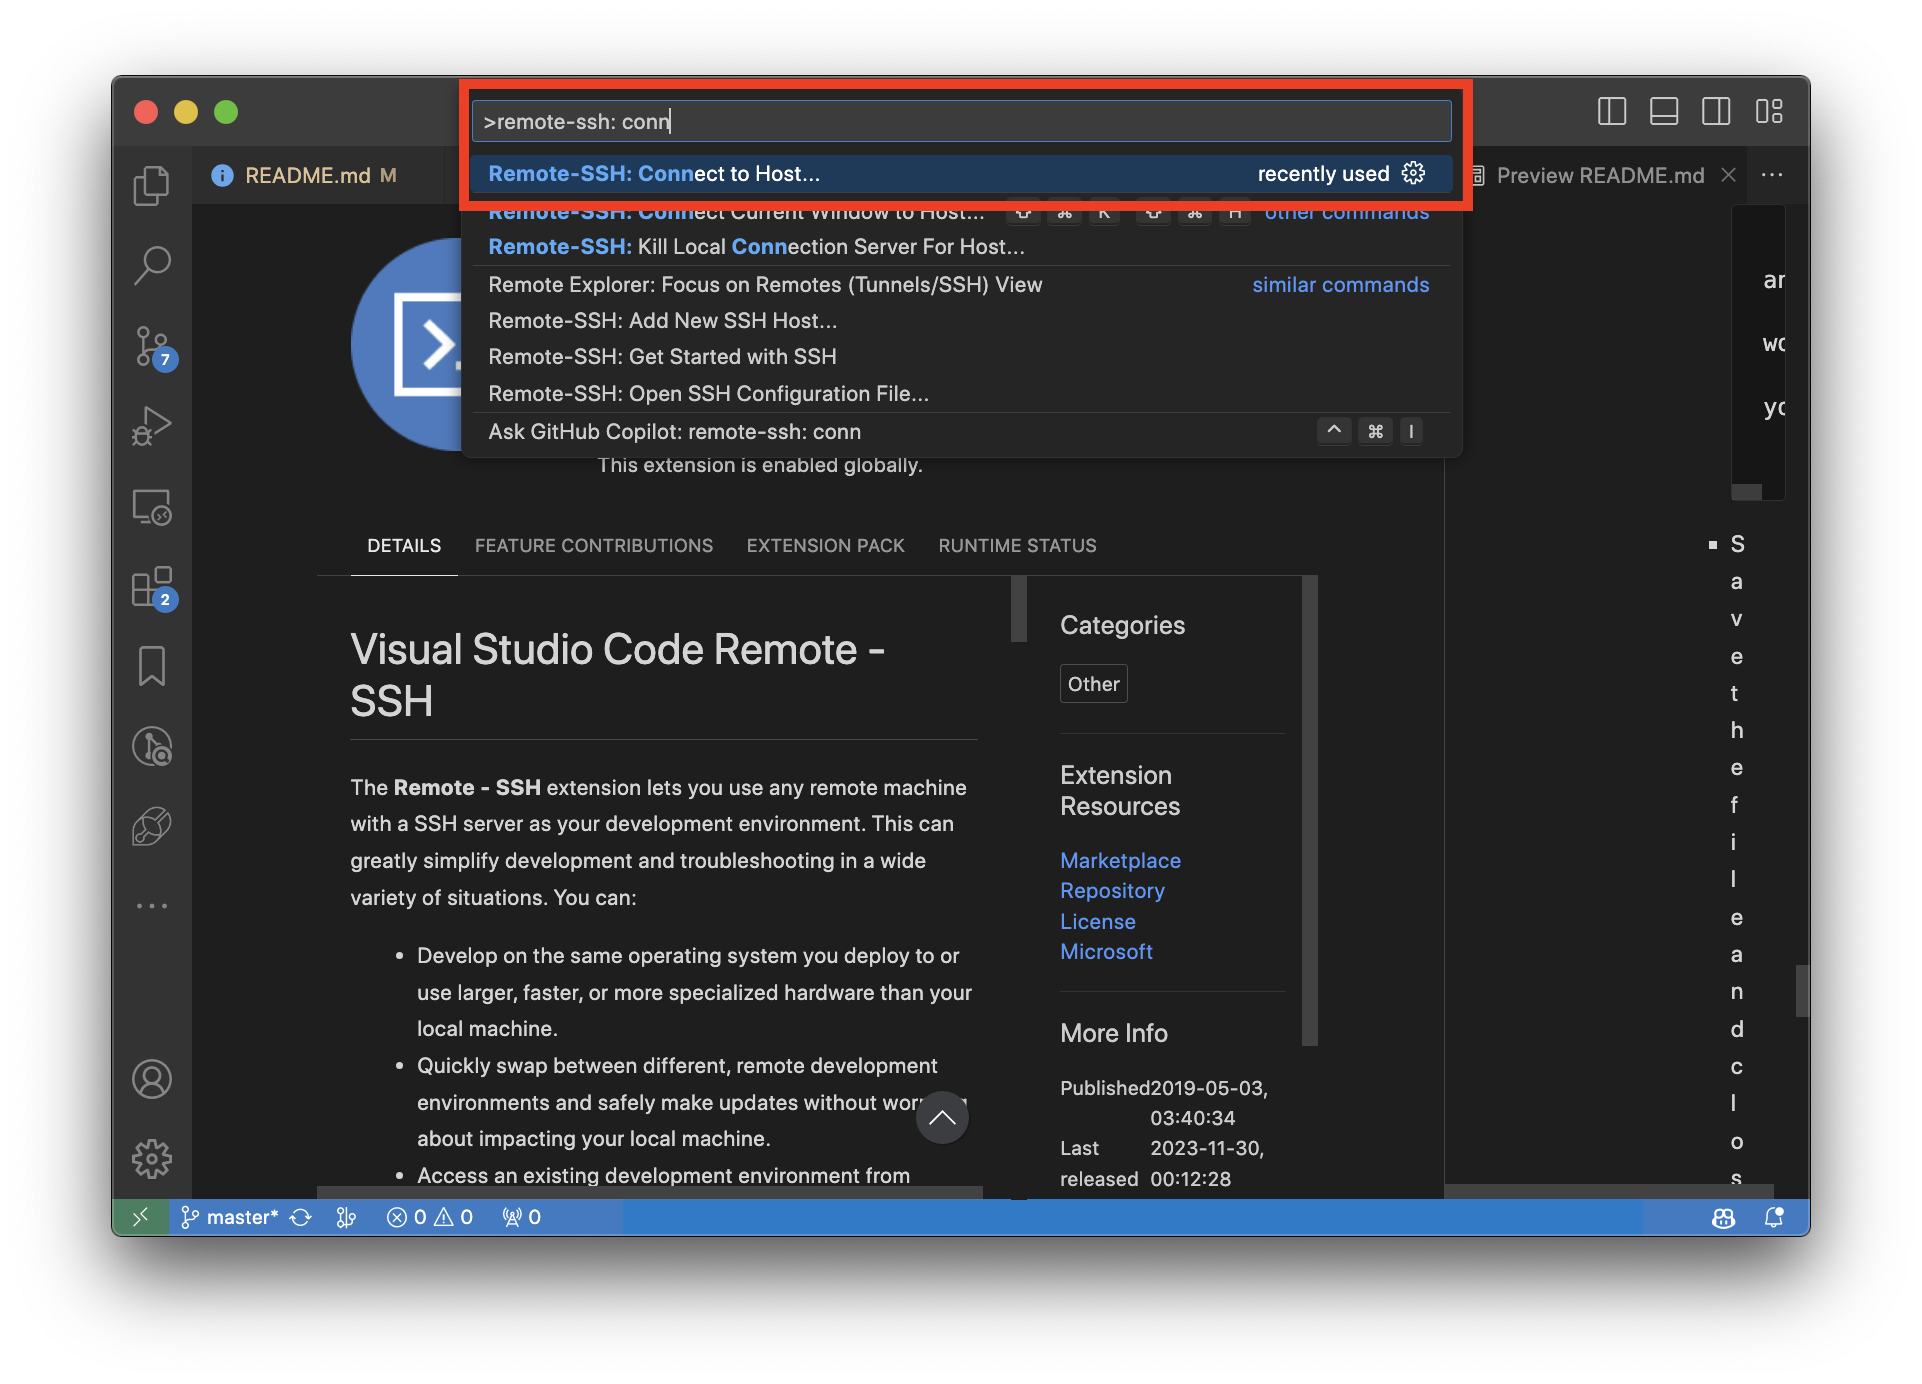
- Select the name you set in the previous step and press
Enter - If you ssh key authentication is set up correctly, you should be able to connect to the workstation without entering a password. Otherwise, follow the above instructions to make ssh key again!
- Wait for the connection to be established
- You should see the workstation name in the bottom left corner of the VS Code window. In the example below, the server name is
cilabws05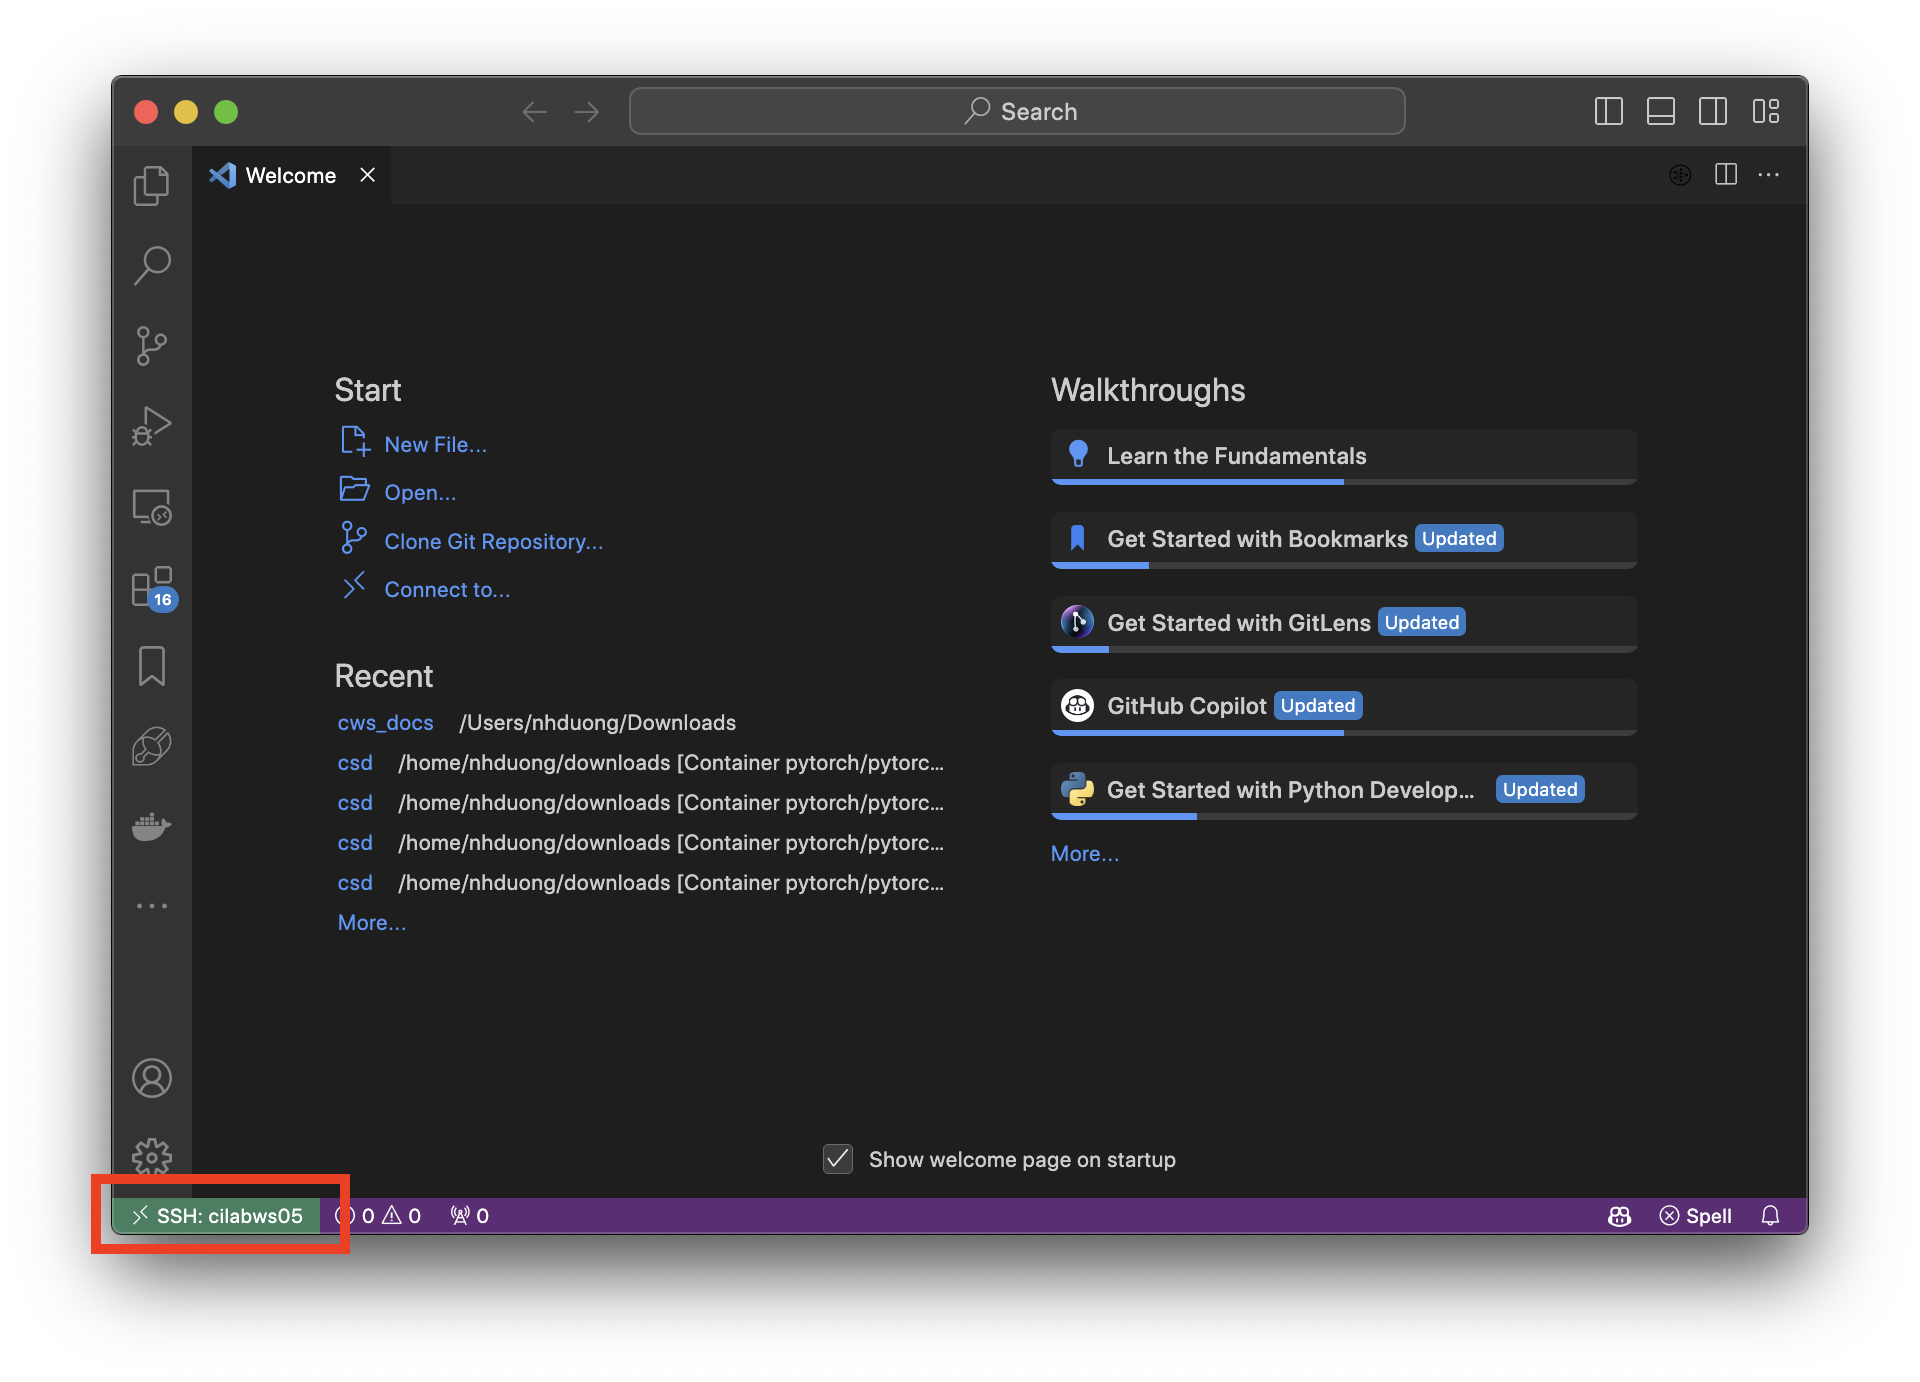
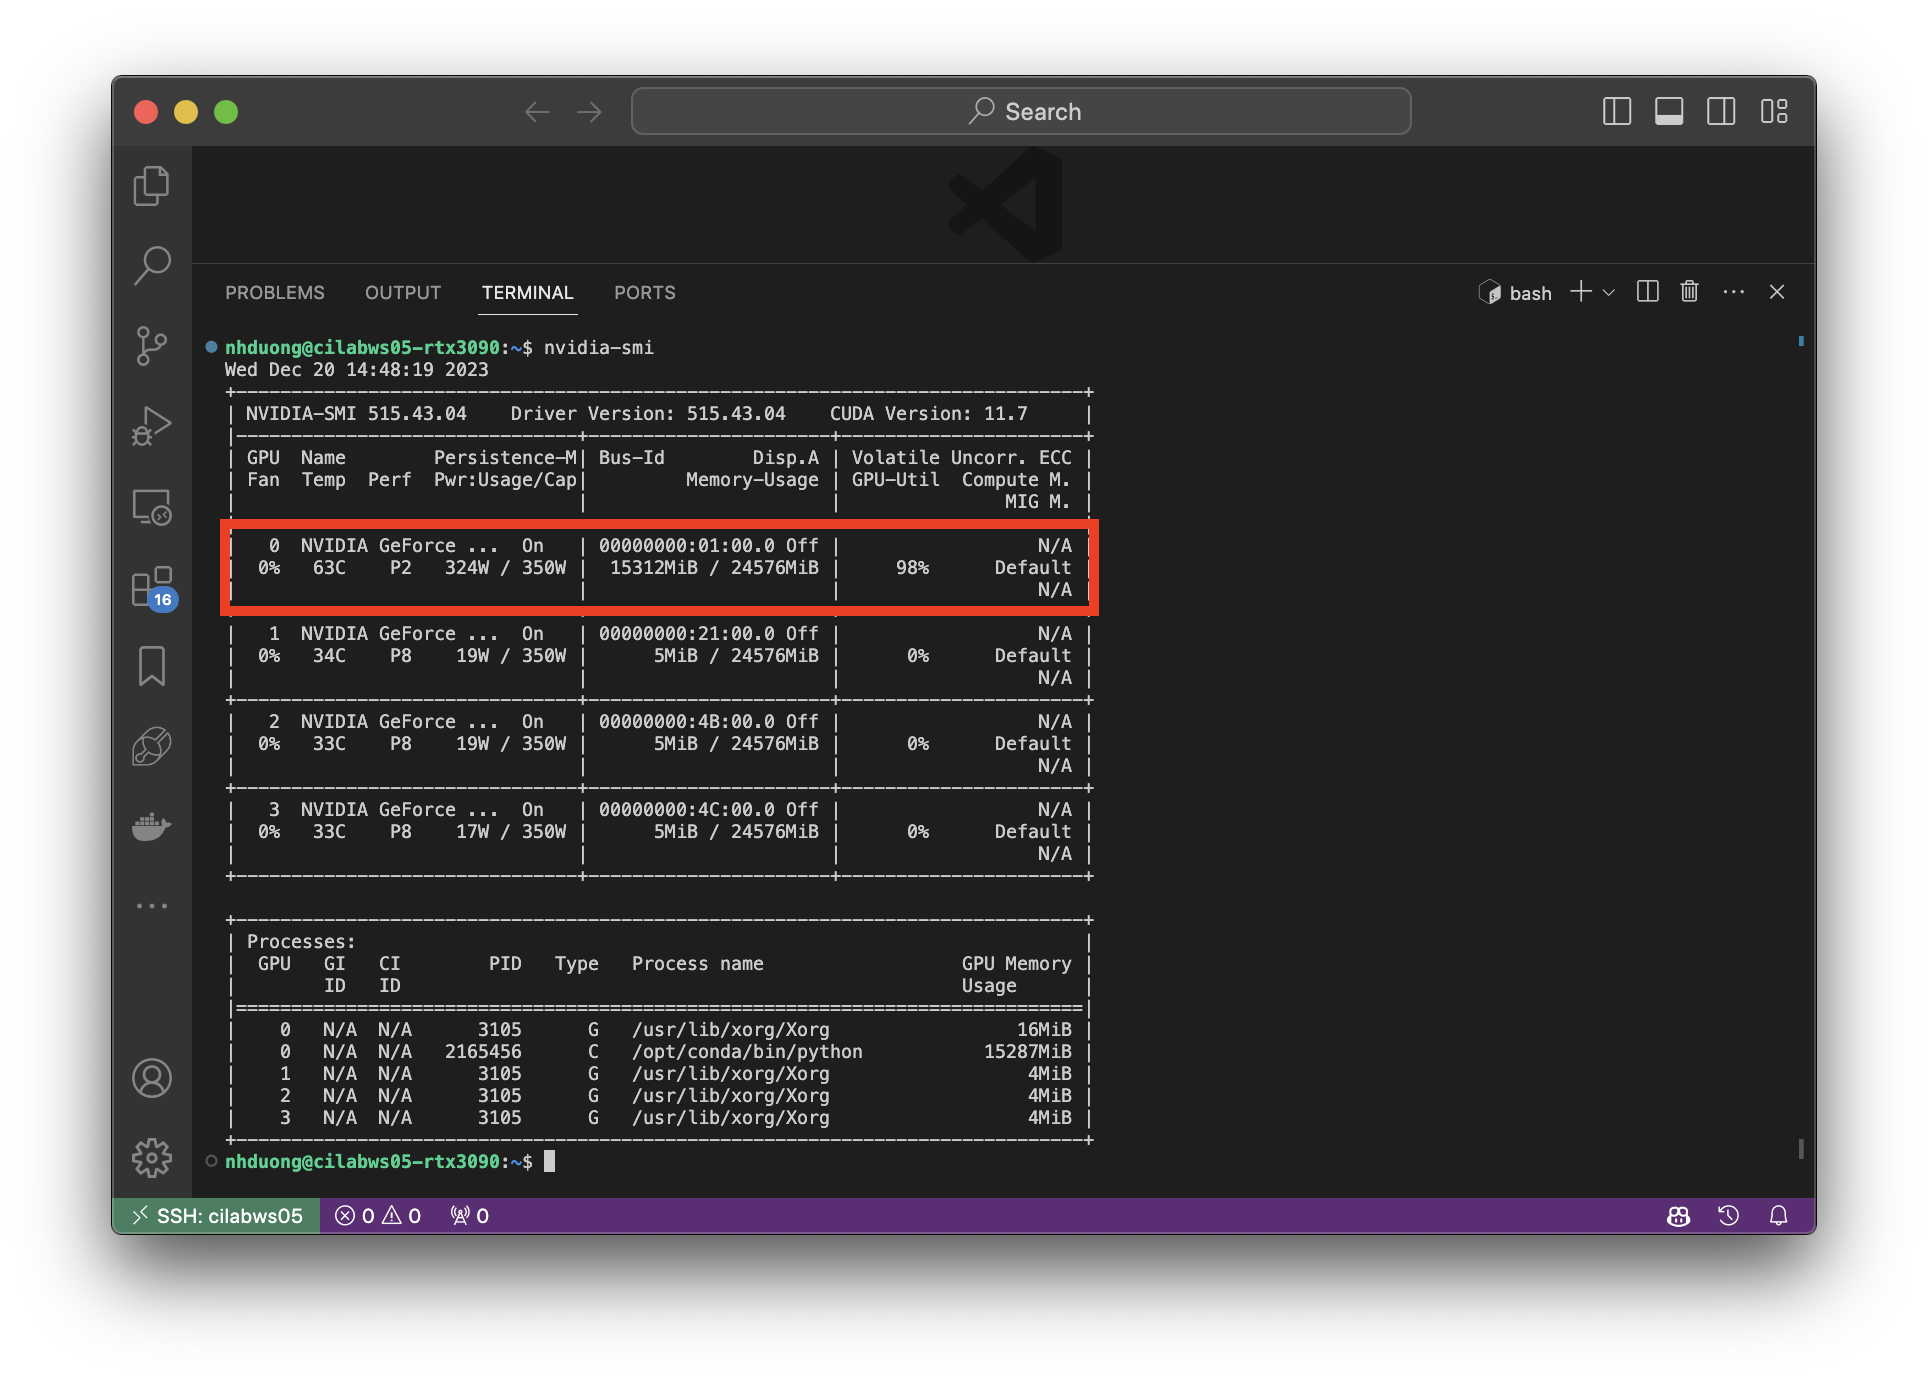
- Let’s look for available GPUs. Open a new terminal by selecting
Terminal -> New Terminalfrom the top menu - Type
cilab-gpuand pressEnter - In the example below, GPU #0 is being used by someone else while GPUs #1, #2, and #3 are free.
Now everything is set up and you can start working on the workstation with VS Code!
Tips and tricks
- With VS Code, in general, a task, e.g., openning a terminal instance, can be done in multiple ways. Play around with it to find the way you like.
- In VS Code, most of the tasks can be done via
Command Paletteand they can also be associated with keyboard shortcuts. Click the wheel icon in the bottom left corner then selectKeyboard Shortcutsfor more information.- In addition the Remote-SSH extension, you can also install other extensions in VS Code. For example, GitLens is useful for managing Git repositories. Recommended extensions: compareit, Edit csv, GitHub Copilot, GitHub Pull Requests and Issues, GitLens, LaTeX Workshop, Markdown All in One, Python, Remote-SSH, Remote Development, TensorBoard, and WSL.
- With LaTeX Workshop, VSCode can be used to write and compile LaTeX documents. The output PDF file can be viewed directly in VSCode.
- To run code in background, you can use
nohupcommand. For example,nohup python train.py &. For more information, visit nohup. Also, you can use screen or tmux for more advanced features.
Scheduling Jobs ⏰
- By default, code runs on GPUs via Terminals or VSCode will be killed after 15 minutes automatically.
- Job needs to be submitted on CILab GPU Scheduler.
In this part, we will learn how to schedule jobs on CILab GPU Scheduler.
- I strongly recommend you to install certificates for a secure connection as you will send your username and SSH key to the server. Without this, other people might be able to see your username and SSH key. You need to do this only once.
- Download the certificates for a secure connection
- Install ALL the certificates by following this instruction
- Open web browser and go to
https://223.195.240.6X:1006where X is the server number. - If you see a warning message from the browser, it is because you have not installed the certificates! If you risk it, you can click on
Advancedand thenProceed to 223.195.240.6X (unsafe)to continue. The below figure is the login page of the GPU scheduler.
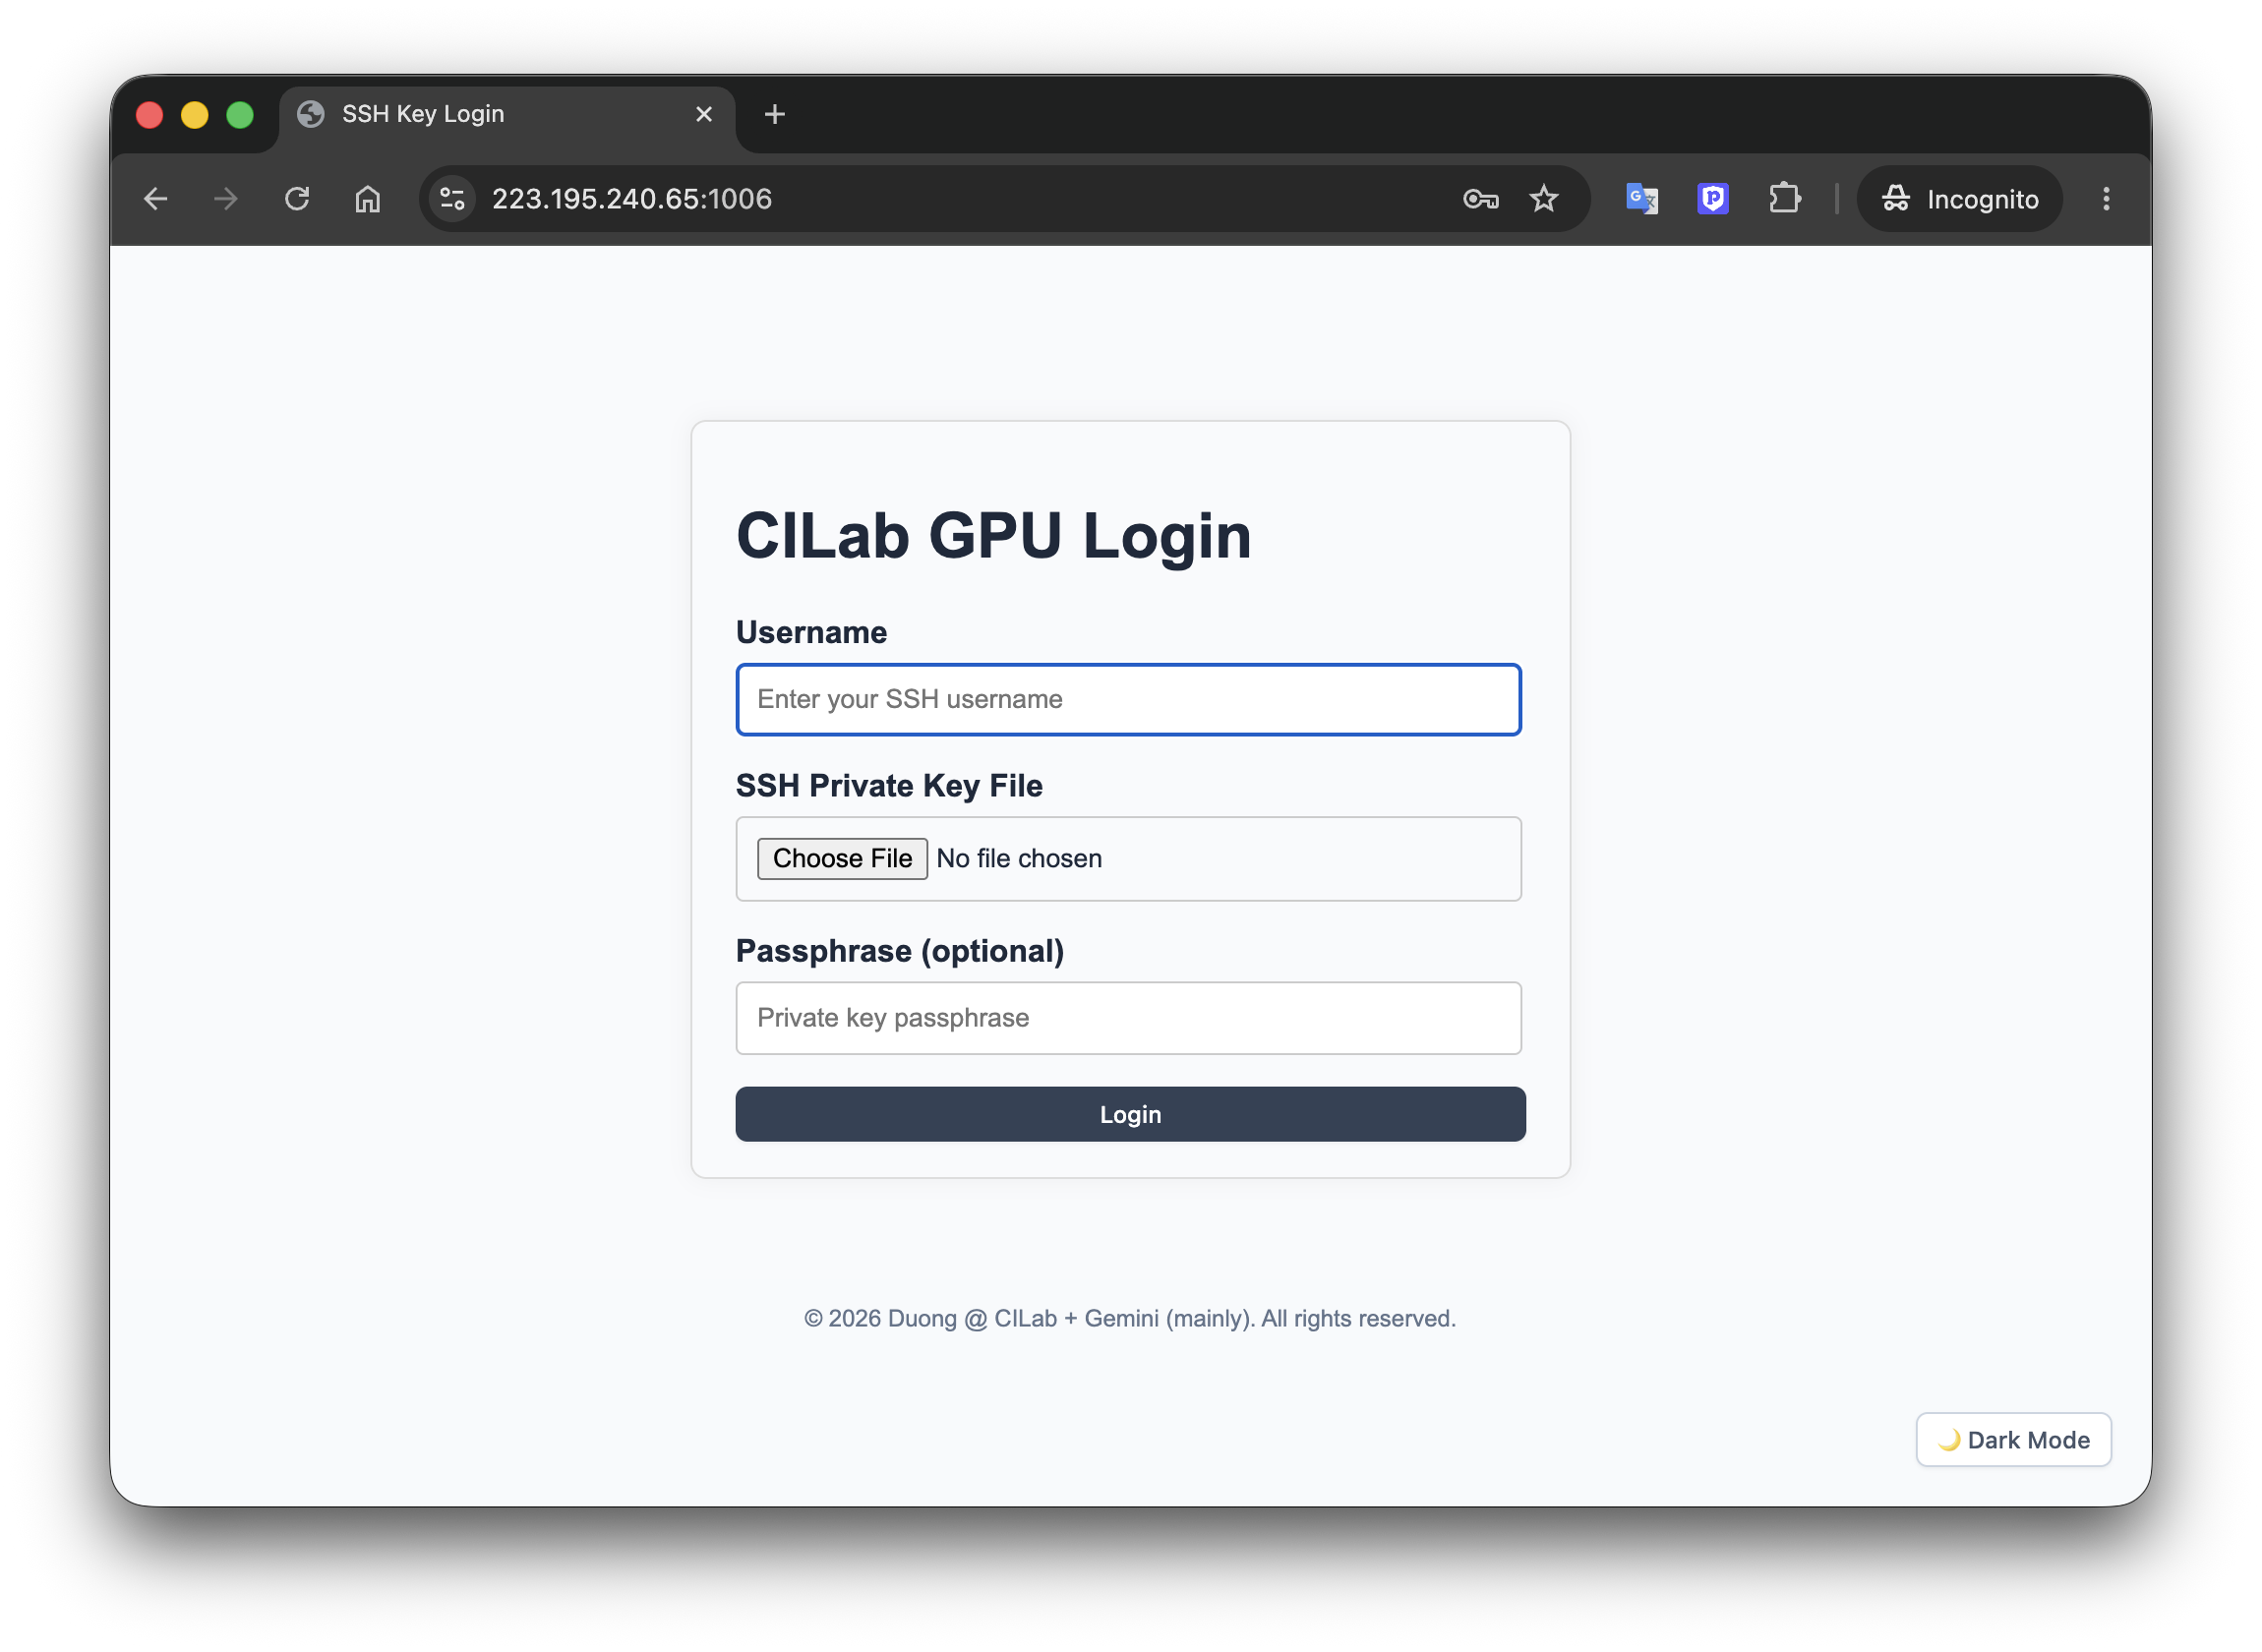
Enter your username and select your private SSH key file, usually located at
~/.ssh/id_ed25519(Linux/MacOS) orC:\Users\your_username\.ssh\id_ed25519(Windows). Then click on theLoginbutton.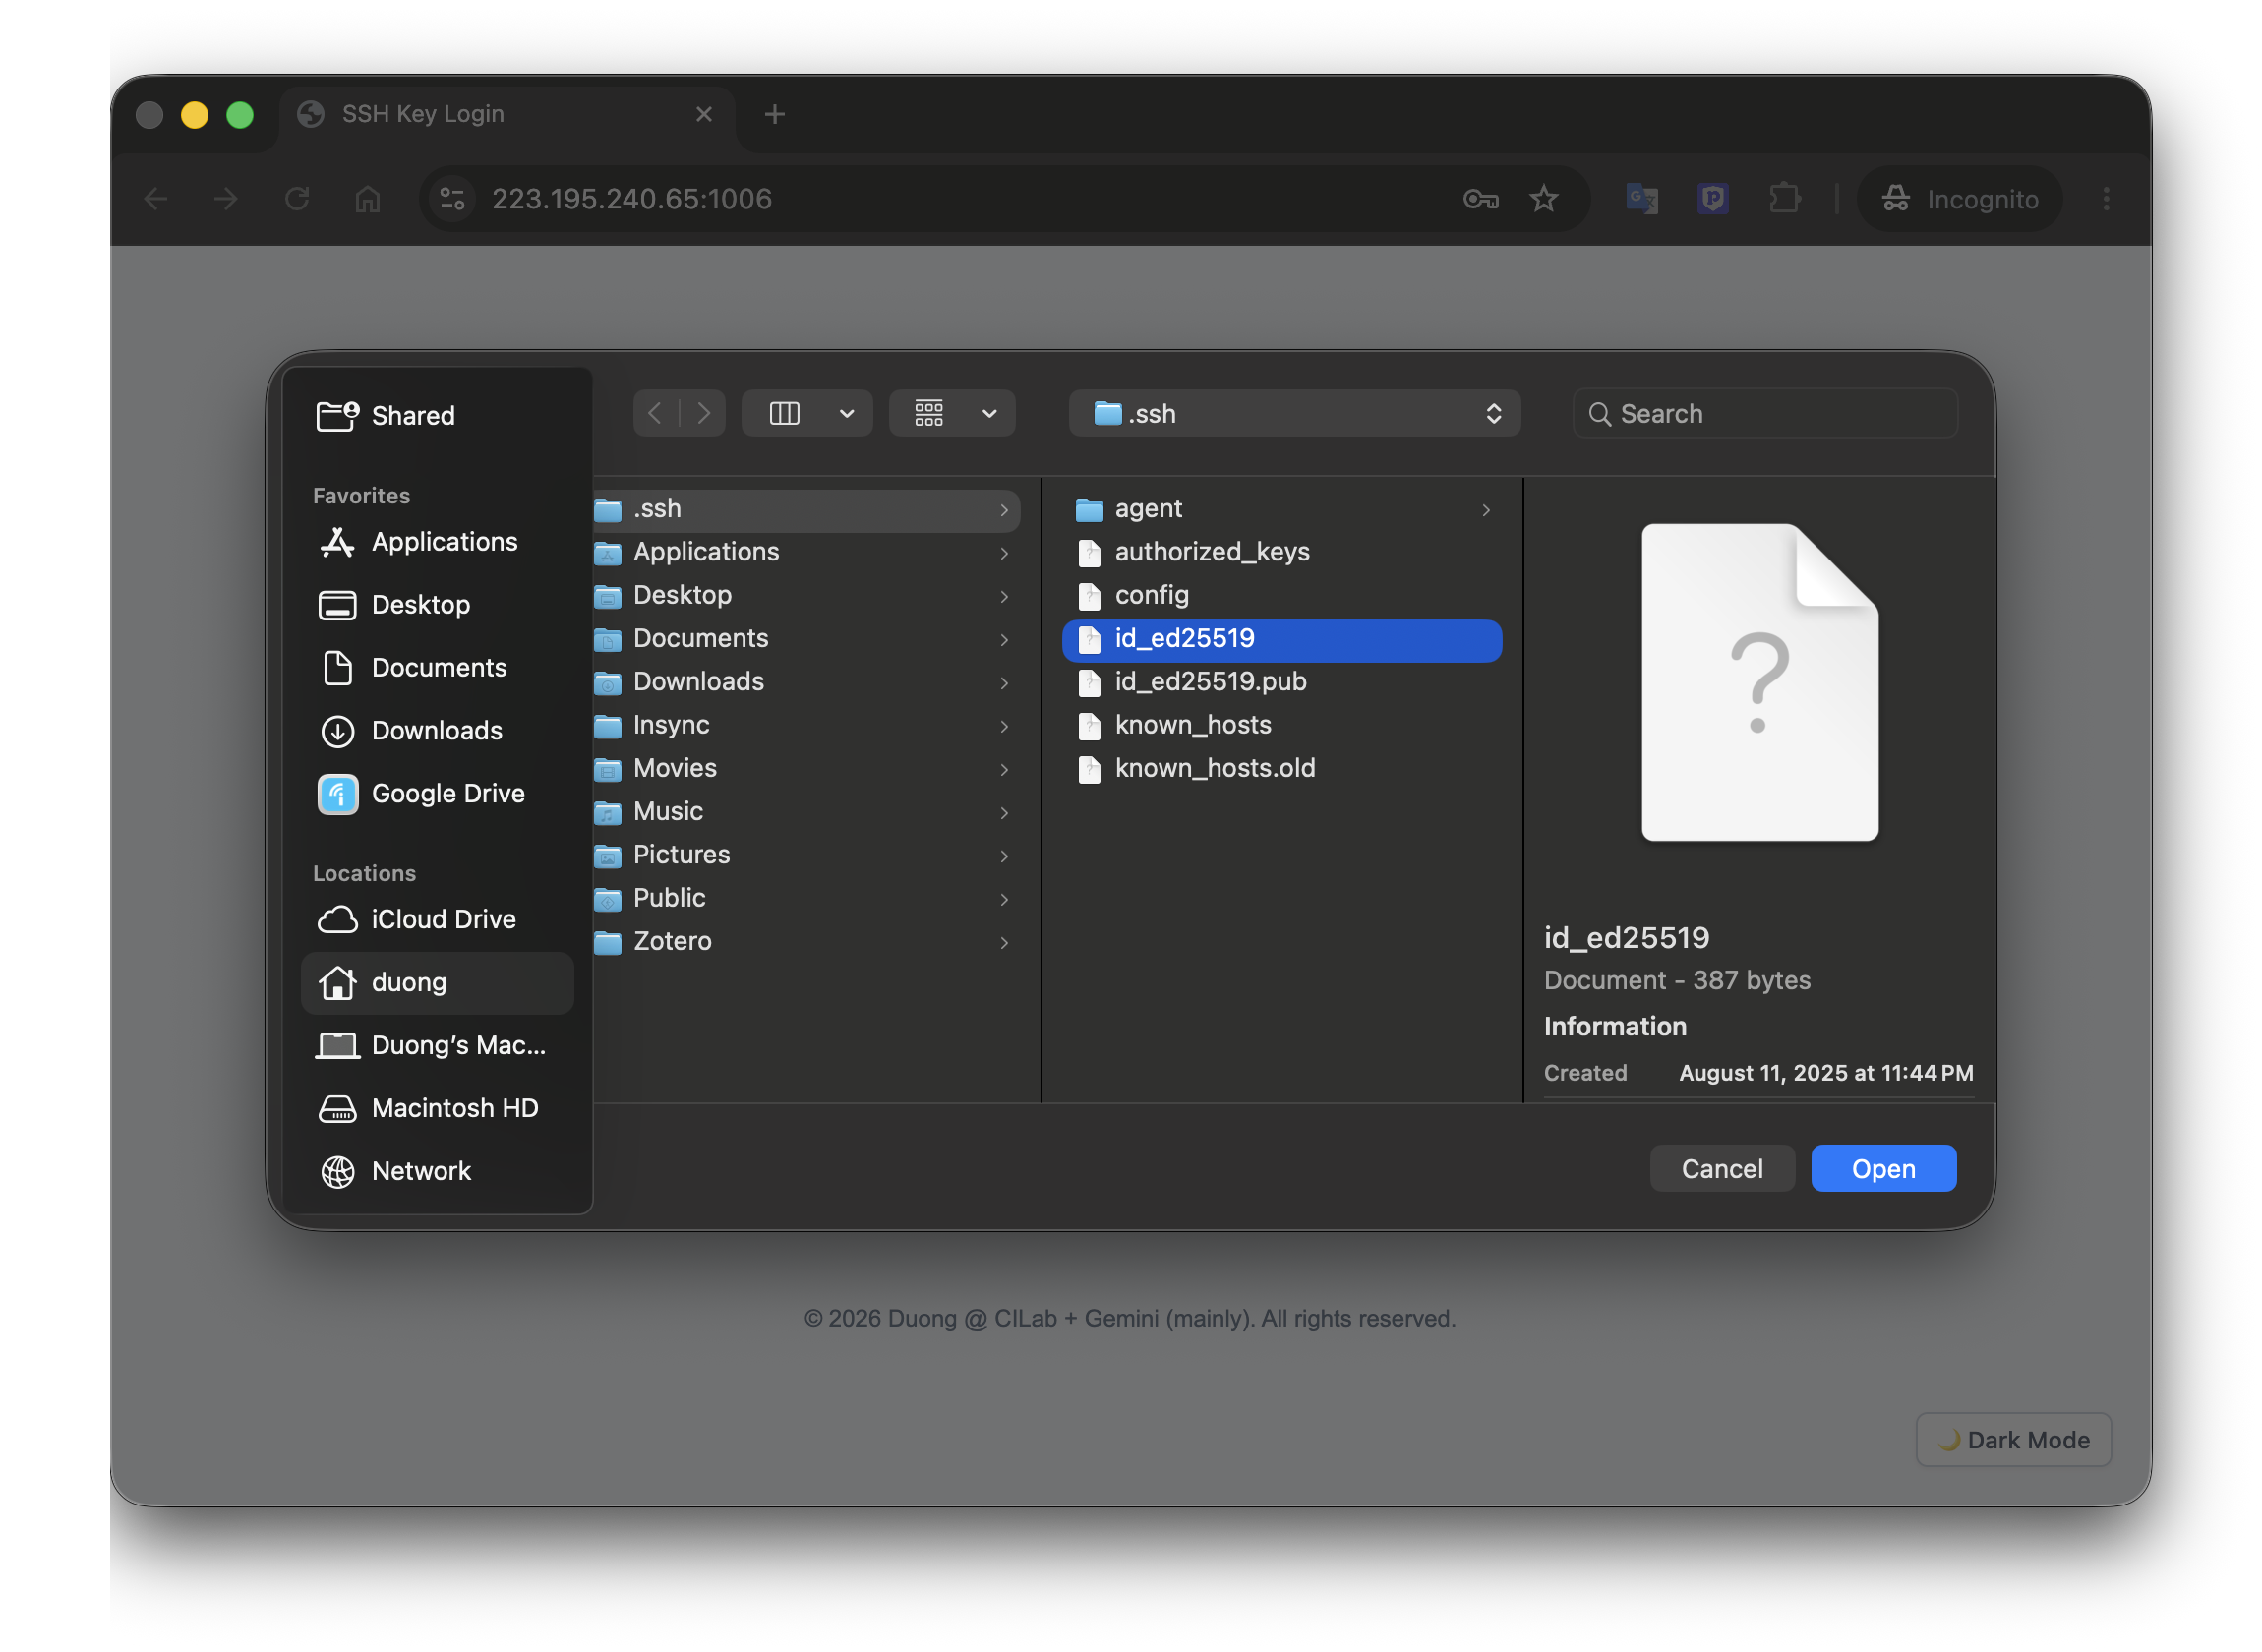
You will be redirected to the dashboard page. Here is the screenshot of the dashboard page.
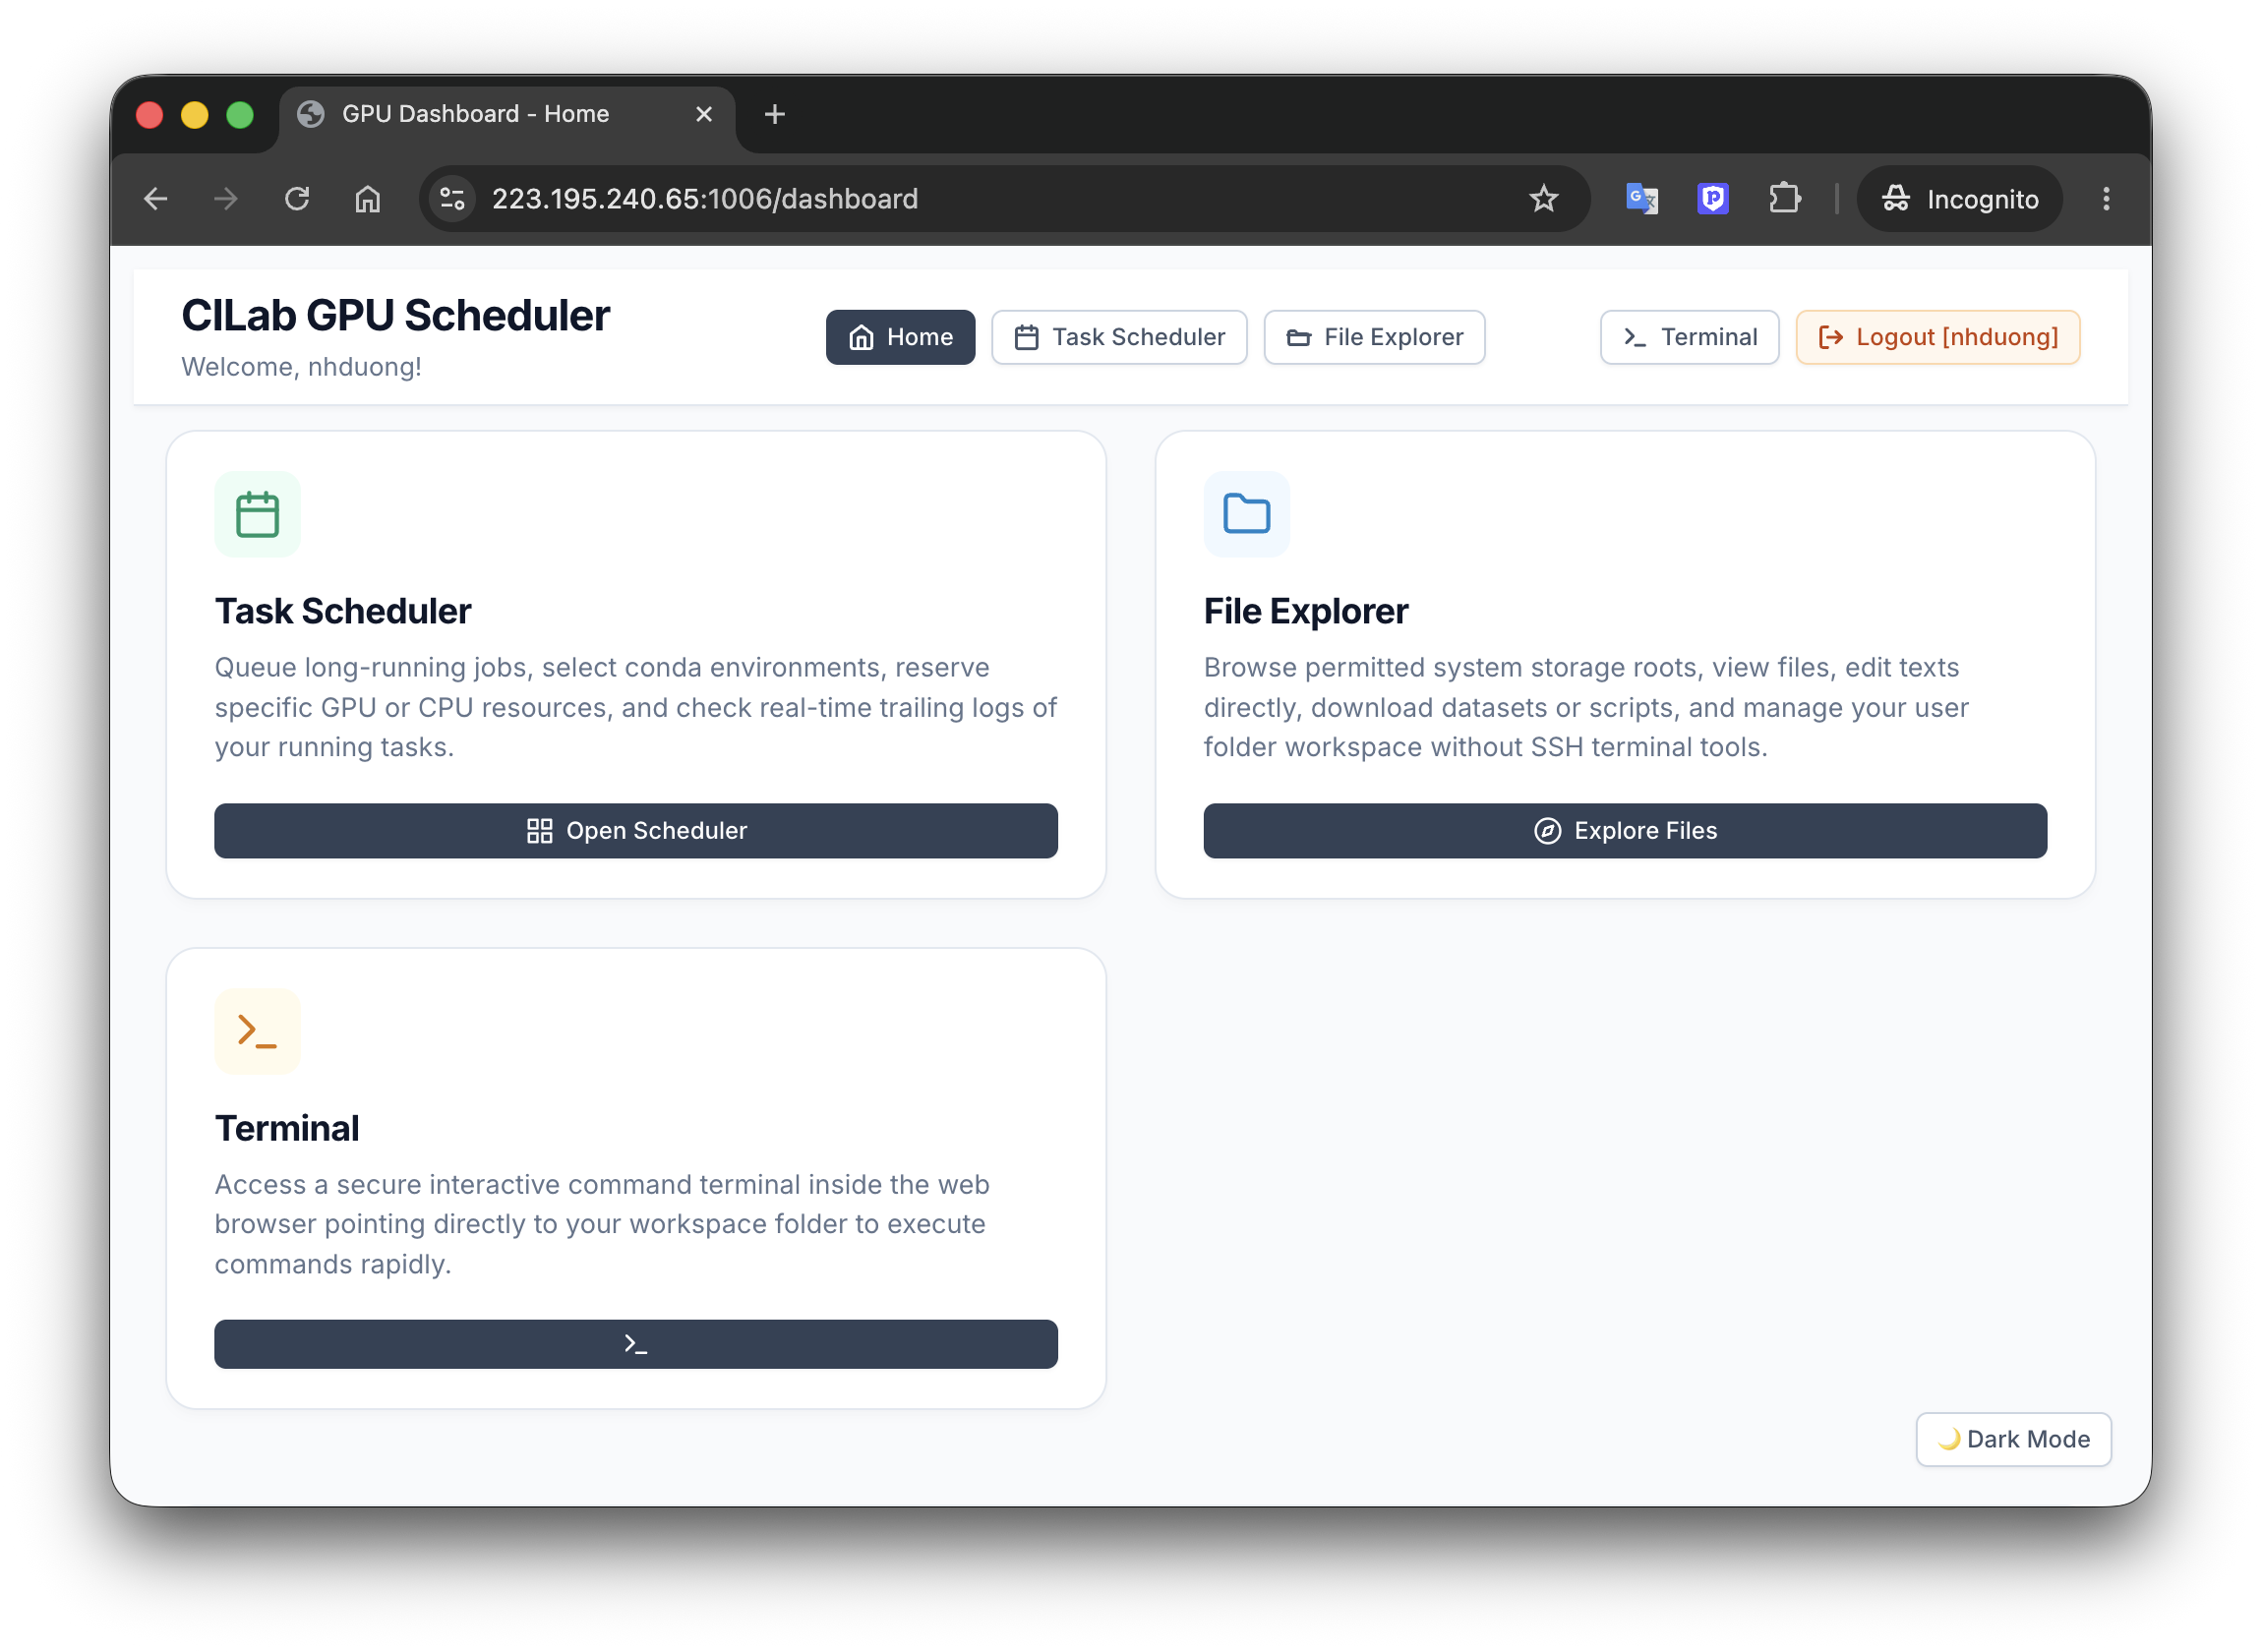
There are three main sections in the dashboard page:
Job Scheduleris for submitting and managing your jobs.File Exploreris for managing and visually inspecting your files on the workstation.Terminalis for running commands on the workstation.
We will use the
Job Schedulerto submit and manage your jobs in the following sections.- Click on the
Job Schedulertab and you will see the job scheduler page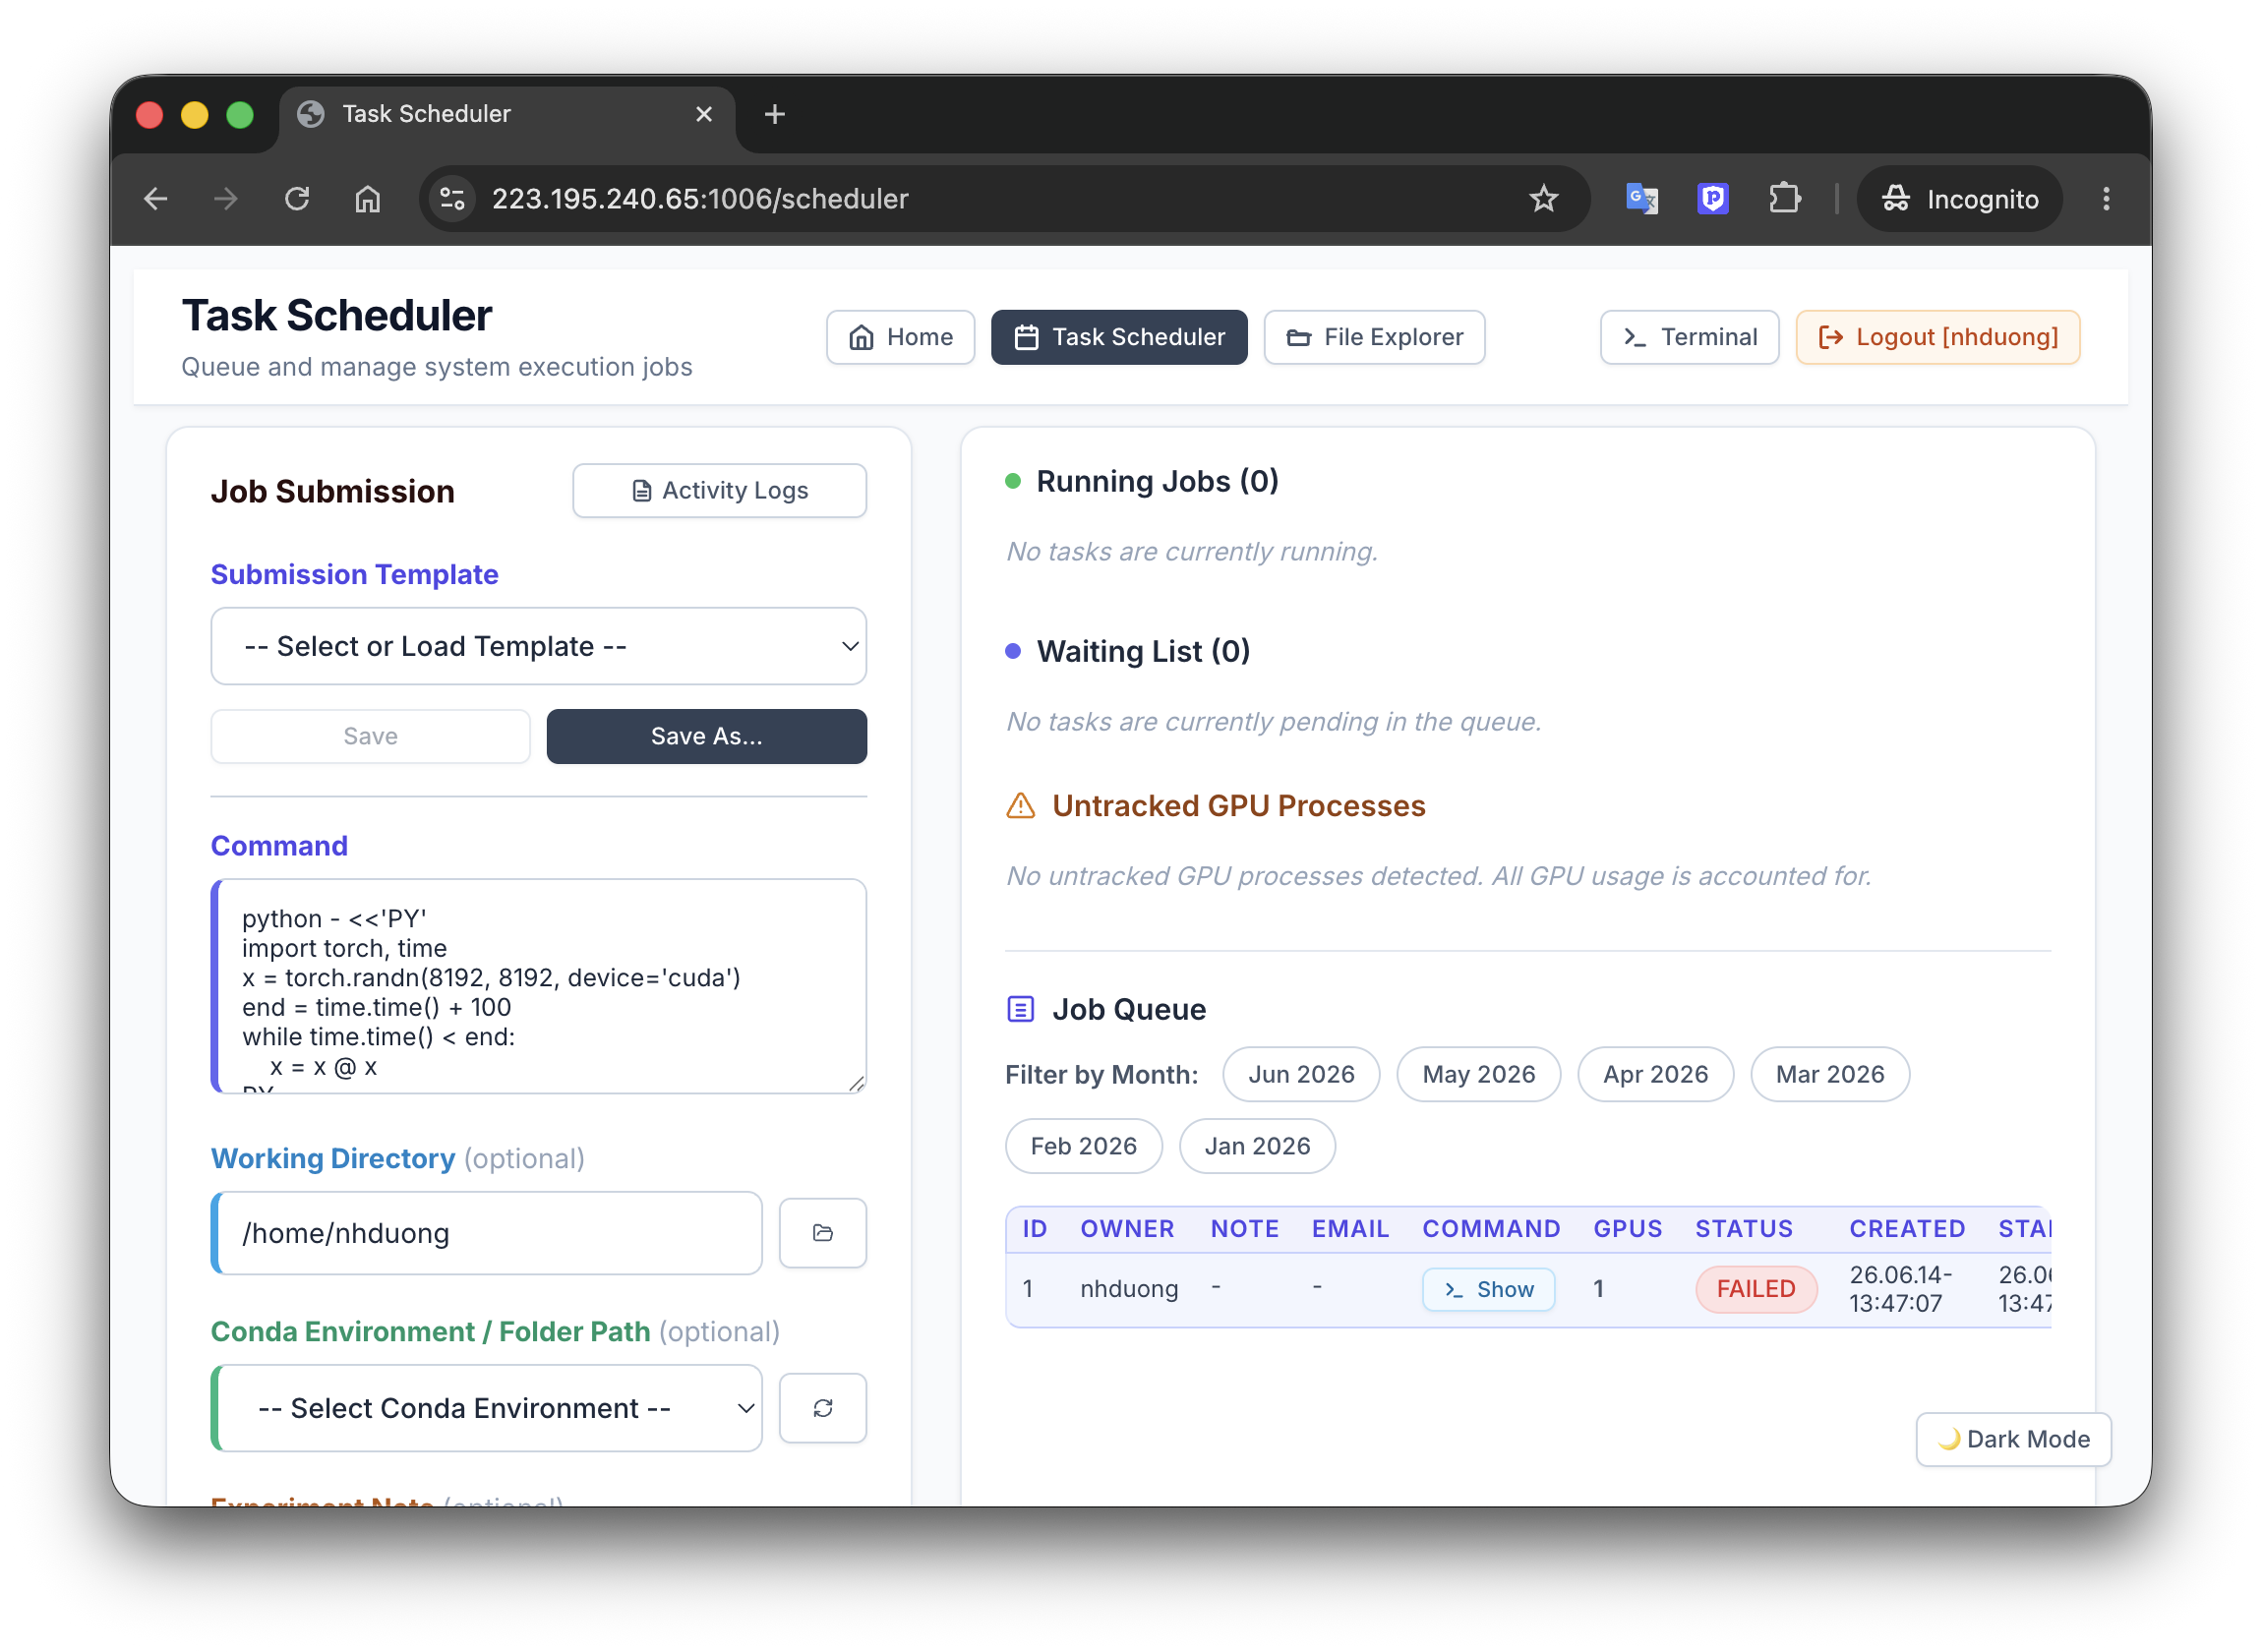
Command: command to run your code, e.g.,python train.py. Please do NOT includeCUDA_DEVICE_ORDERandCUDA_VISIBLE_DEVICESin the command as the GPU scheduler will automatically set them for you based on the GPU(s) you select below. Similarly, please do not use them in your code.Working Directory: the directory where your code is located, e.g.,/home/your_username/your_projectConda Environment: the conda environment you want to use, you can select an existing environment by clicking on the dropdown menuExperiment Note: any note you want to add for the job. This is optionalNotification Email: the email address you want to receive notifications about your job when it is finished or if there is an error. This is optionalGPU / CPU: select CPU or GPUs for your job. You can select multiple GPUs if you need.- You can save all the above information as a template for future use by clicking on the
Save As...on the top left corner. This way, you do not need to fill in the information every time you submit a job. - Now you can submit your job by clicking on the
Submit Taskbutton. You will see your job in theJob Queuesection. The below figure shows an example of a job submission and the job is running successfully.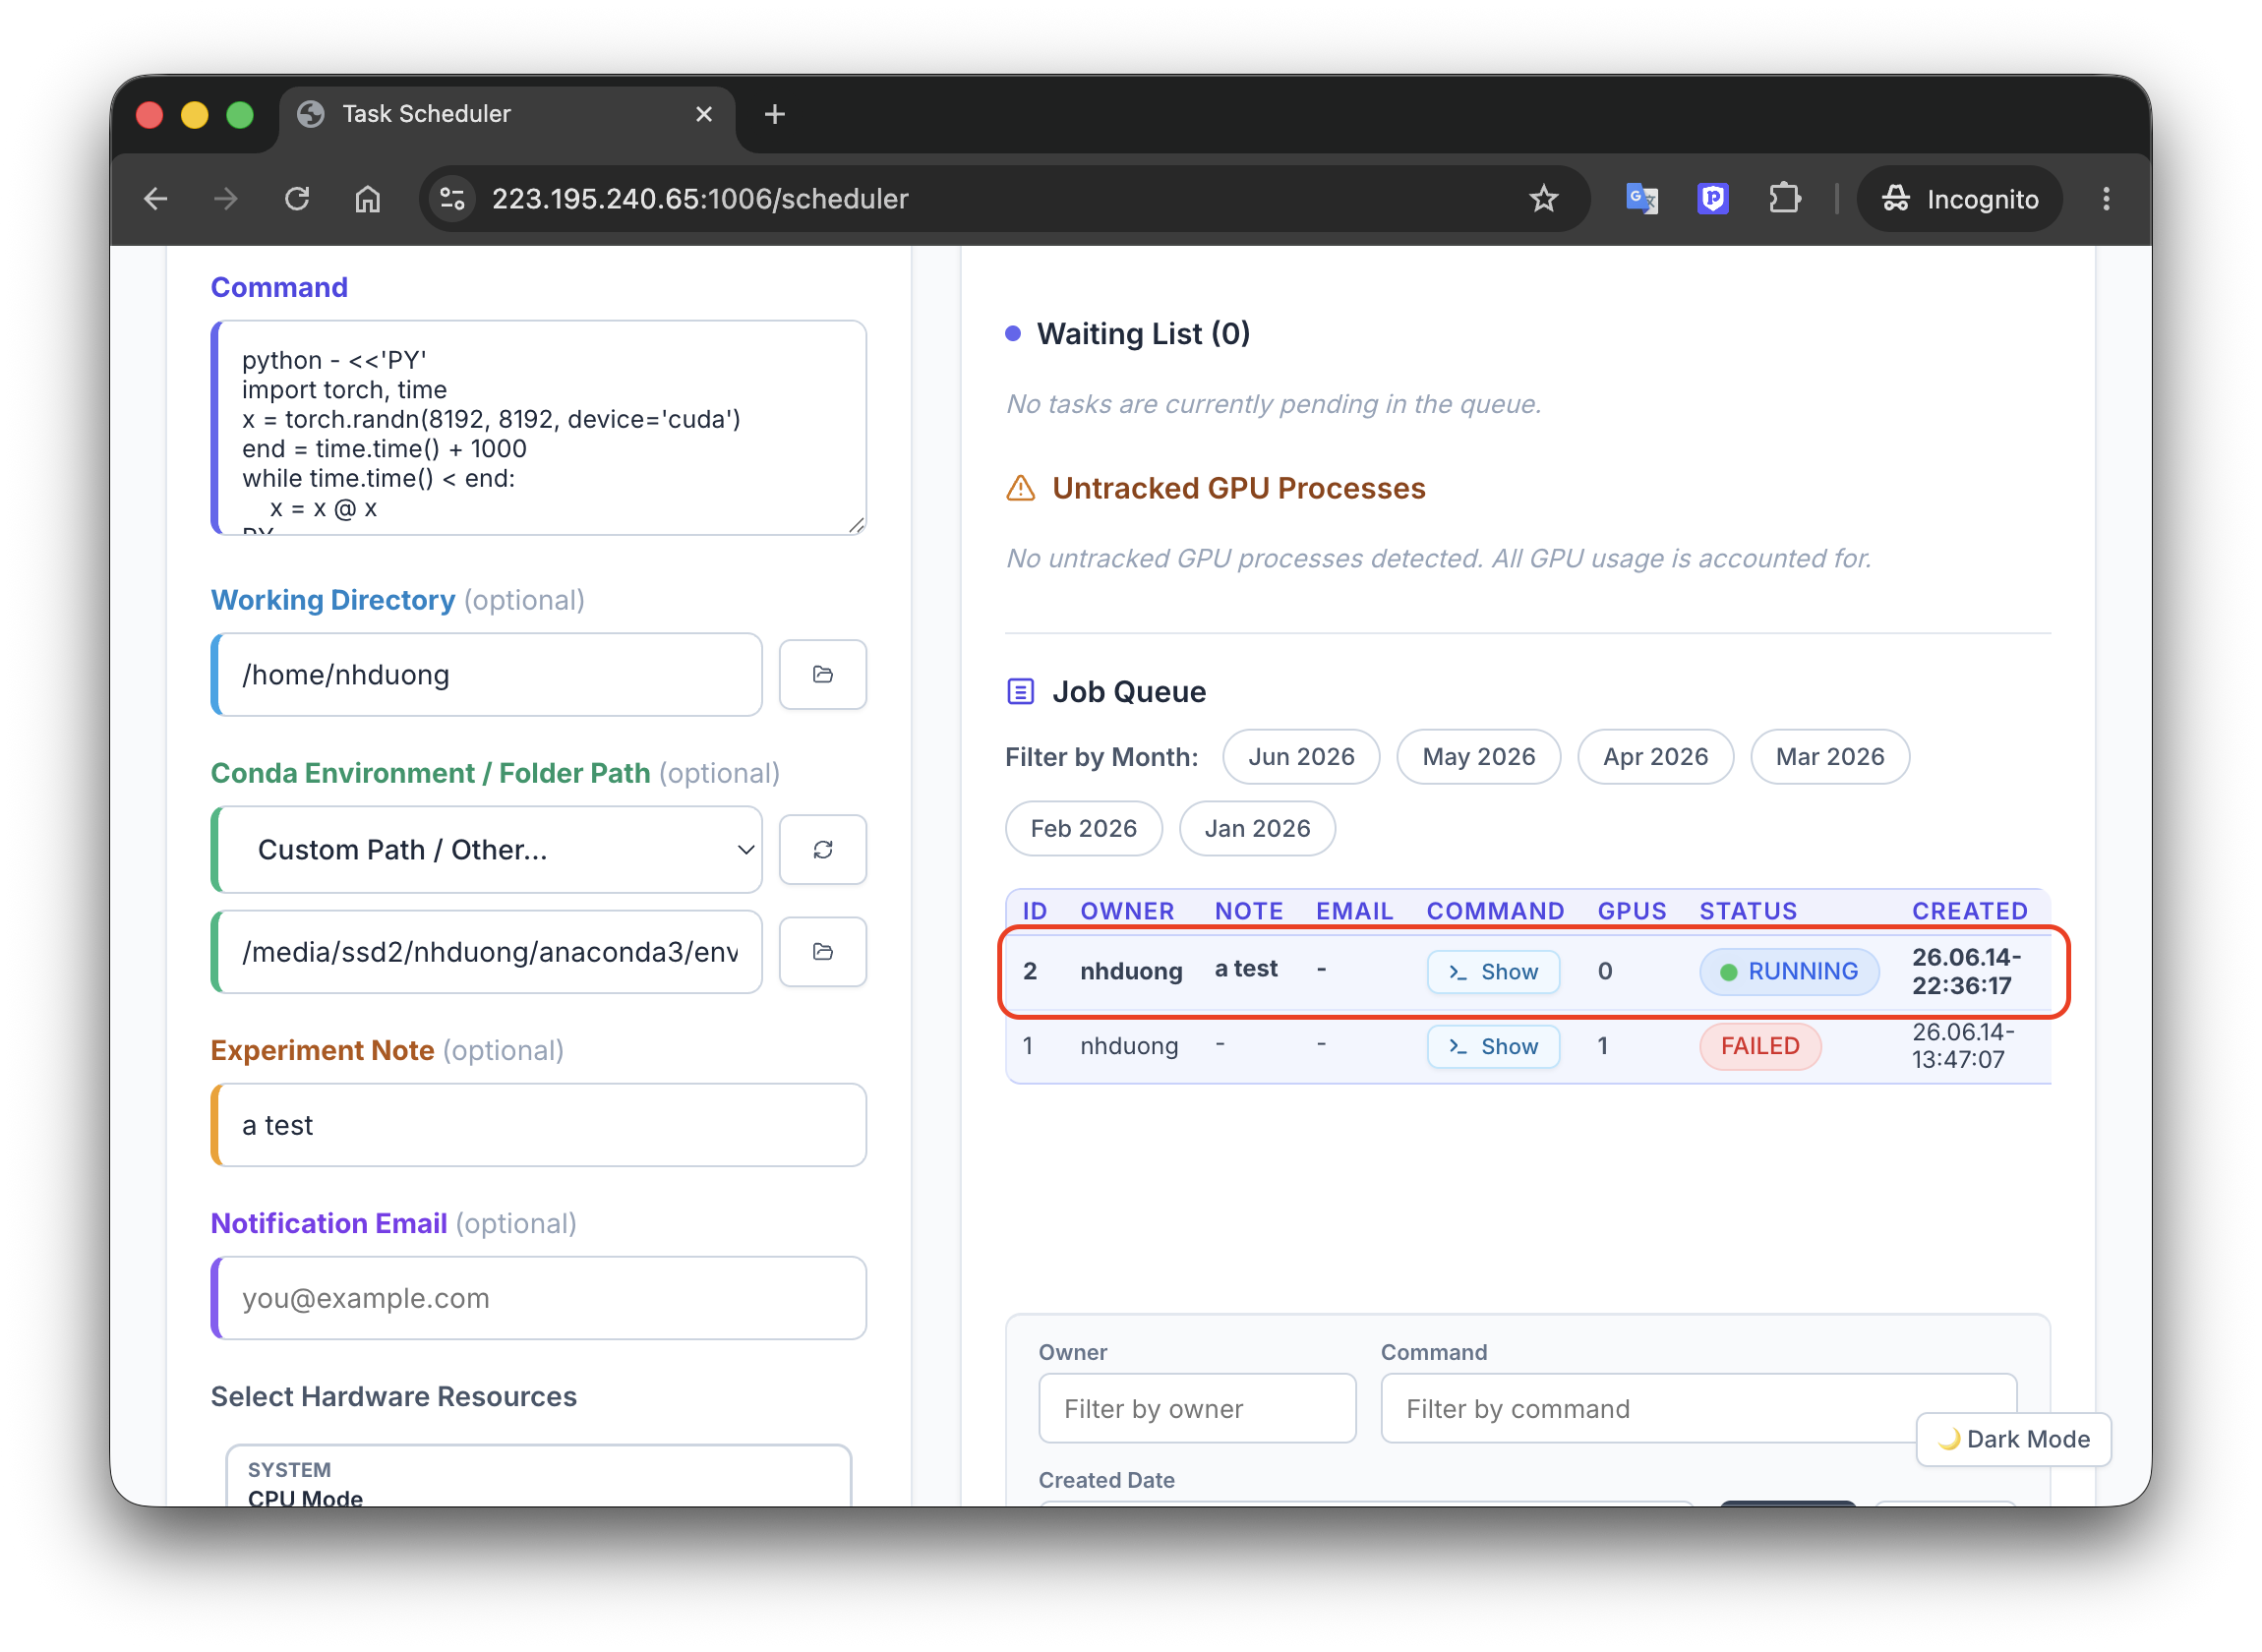
- The job will be managed automatically by the GPU scheduler. In case you select GPUs that are currently being used by other members, your job will be put in the
Waiting Listas below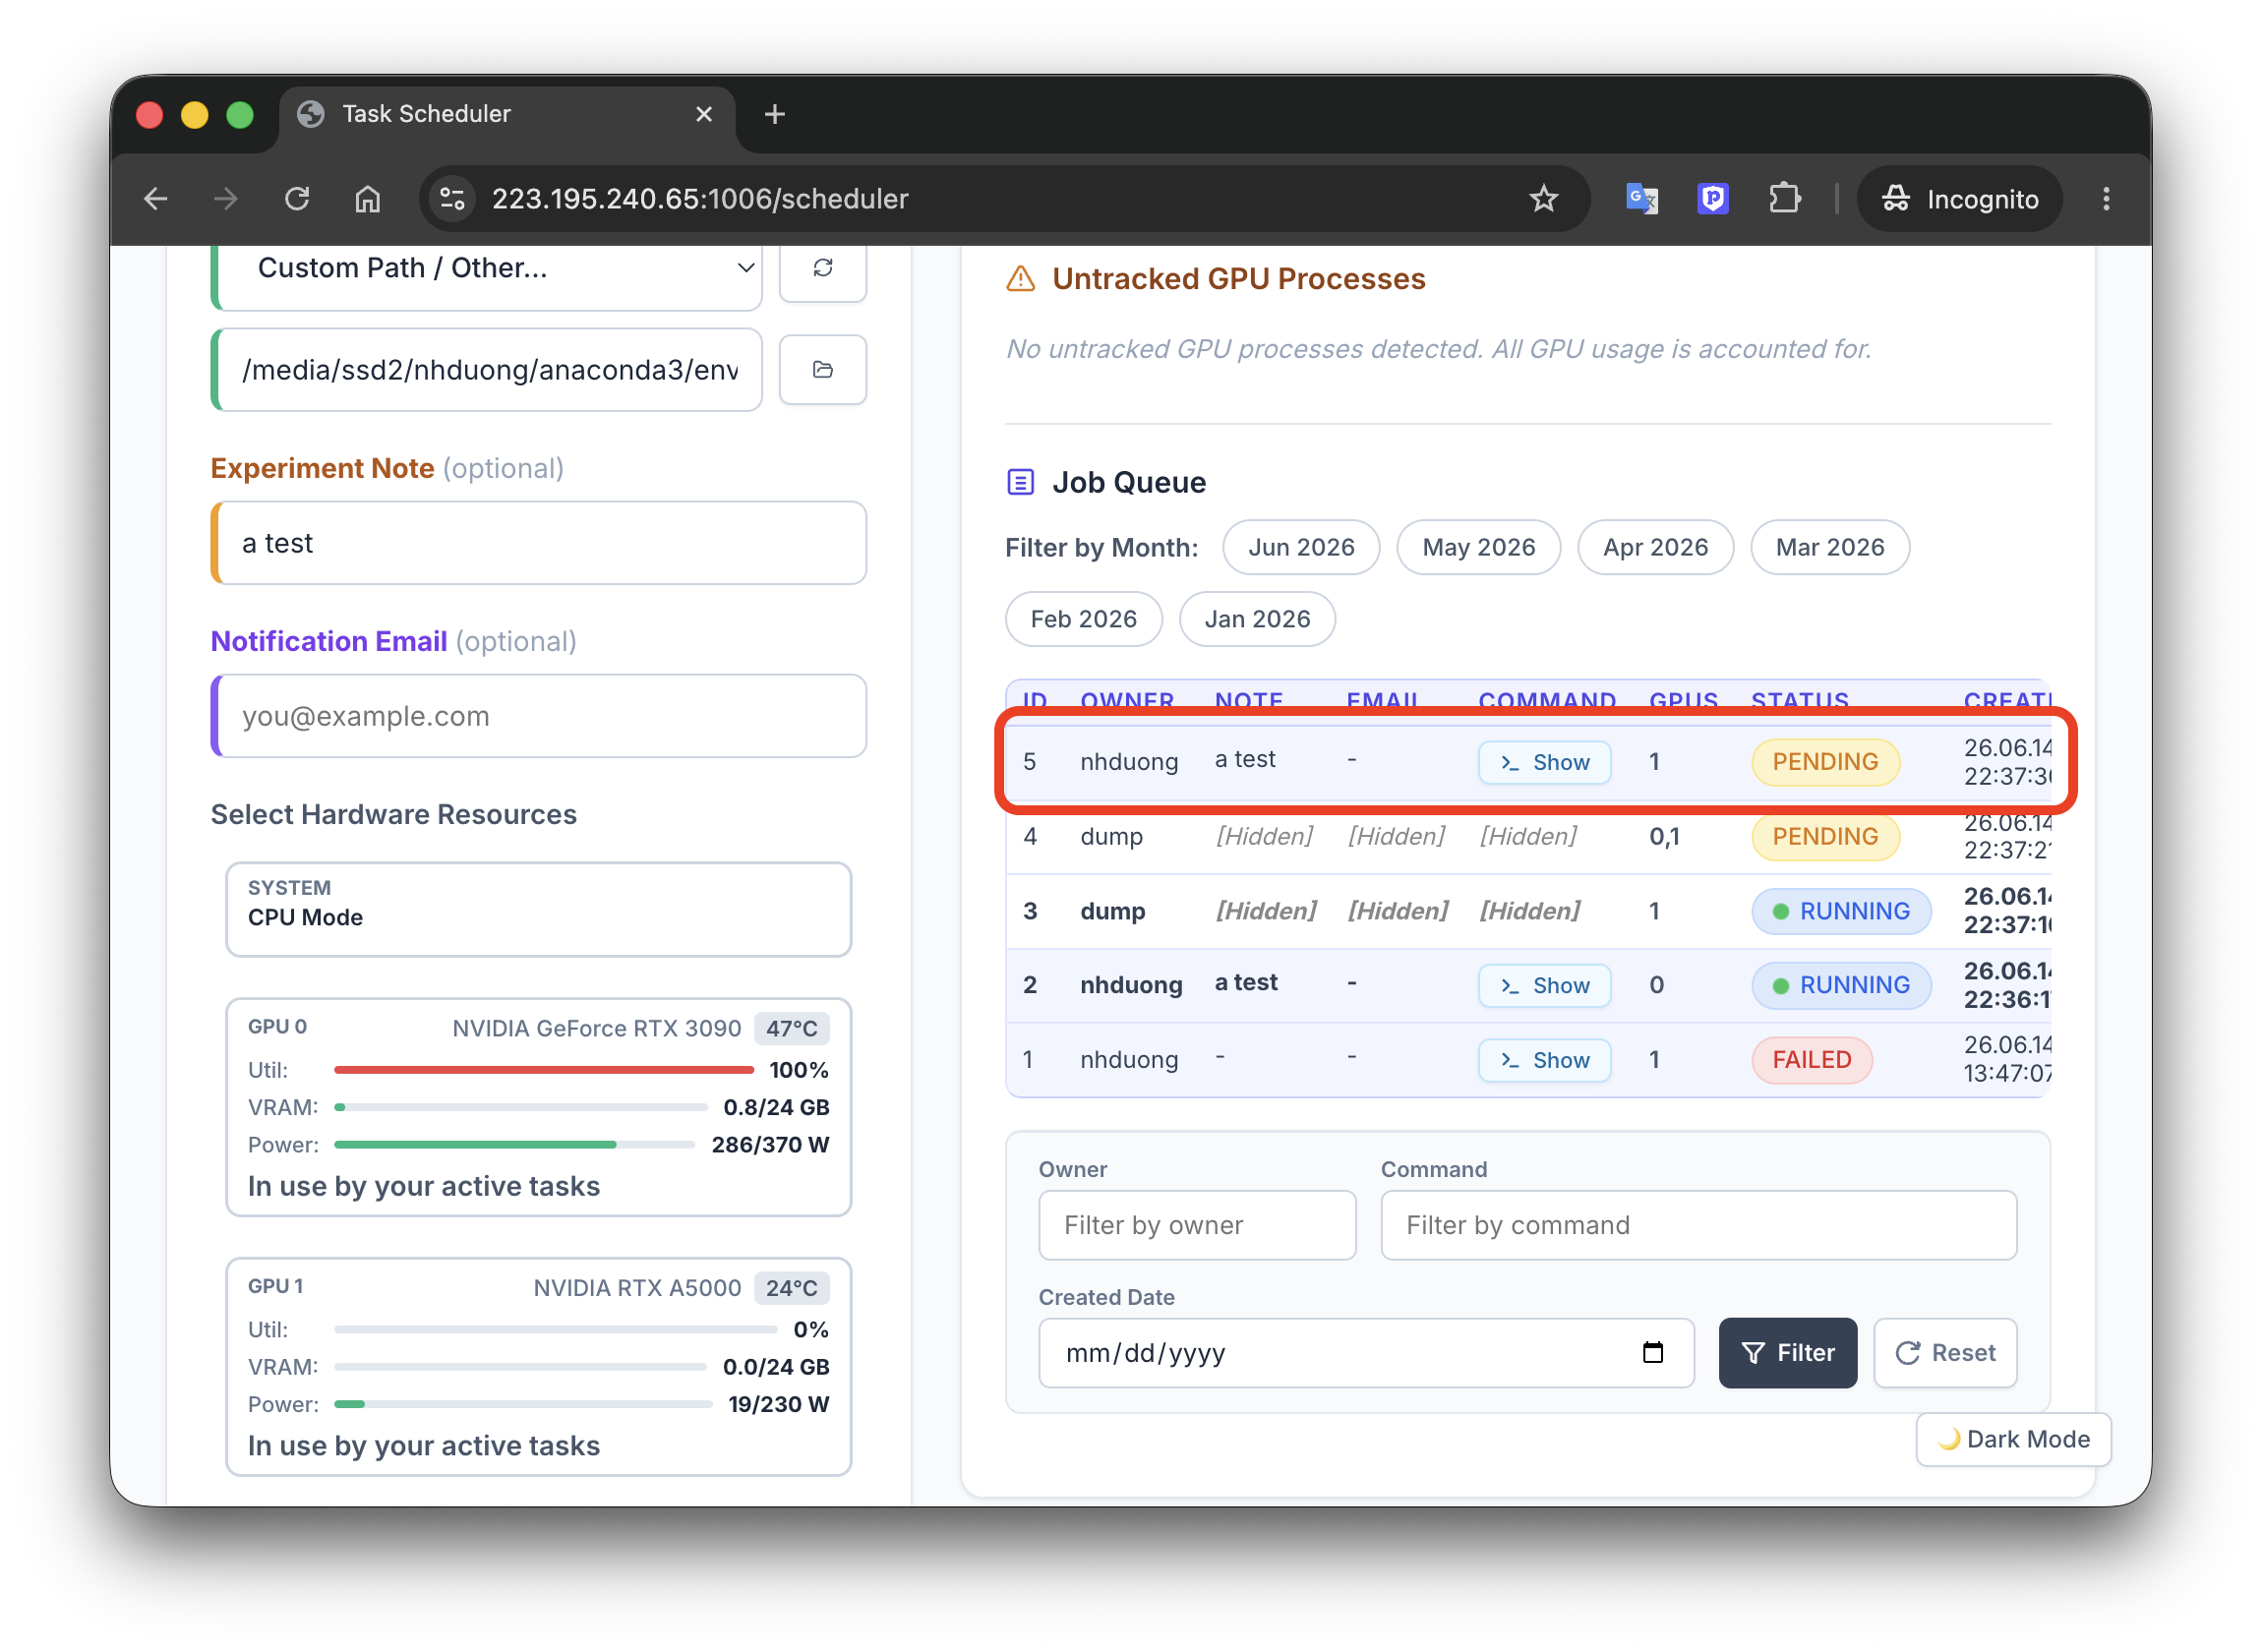
- Your job will start automatically when the GPU(s) you selected are available.
- In this window, you can also
View Logto inspect the process by clickingView Output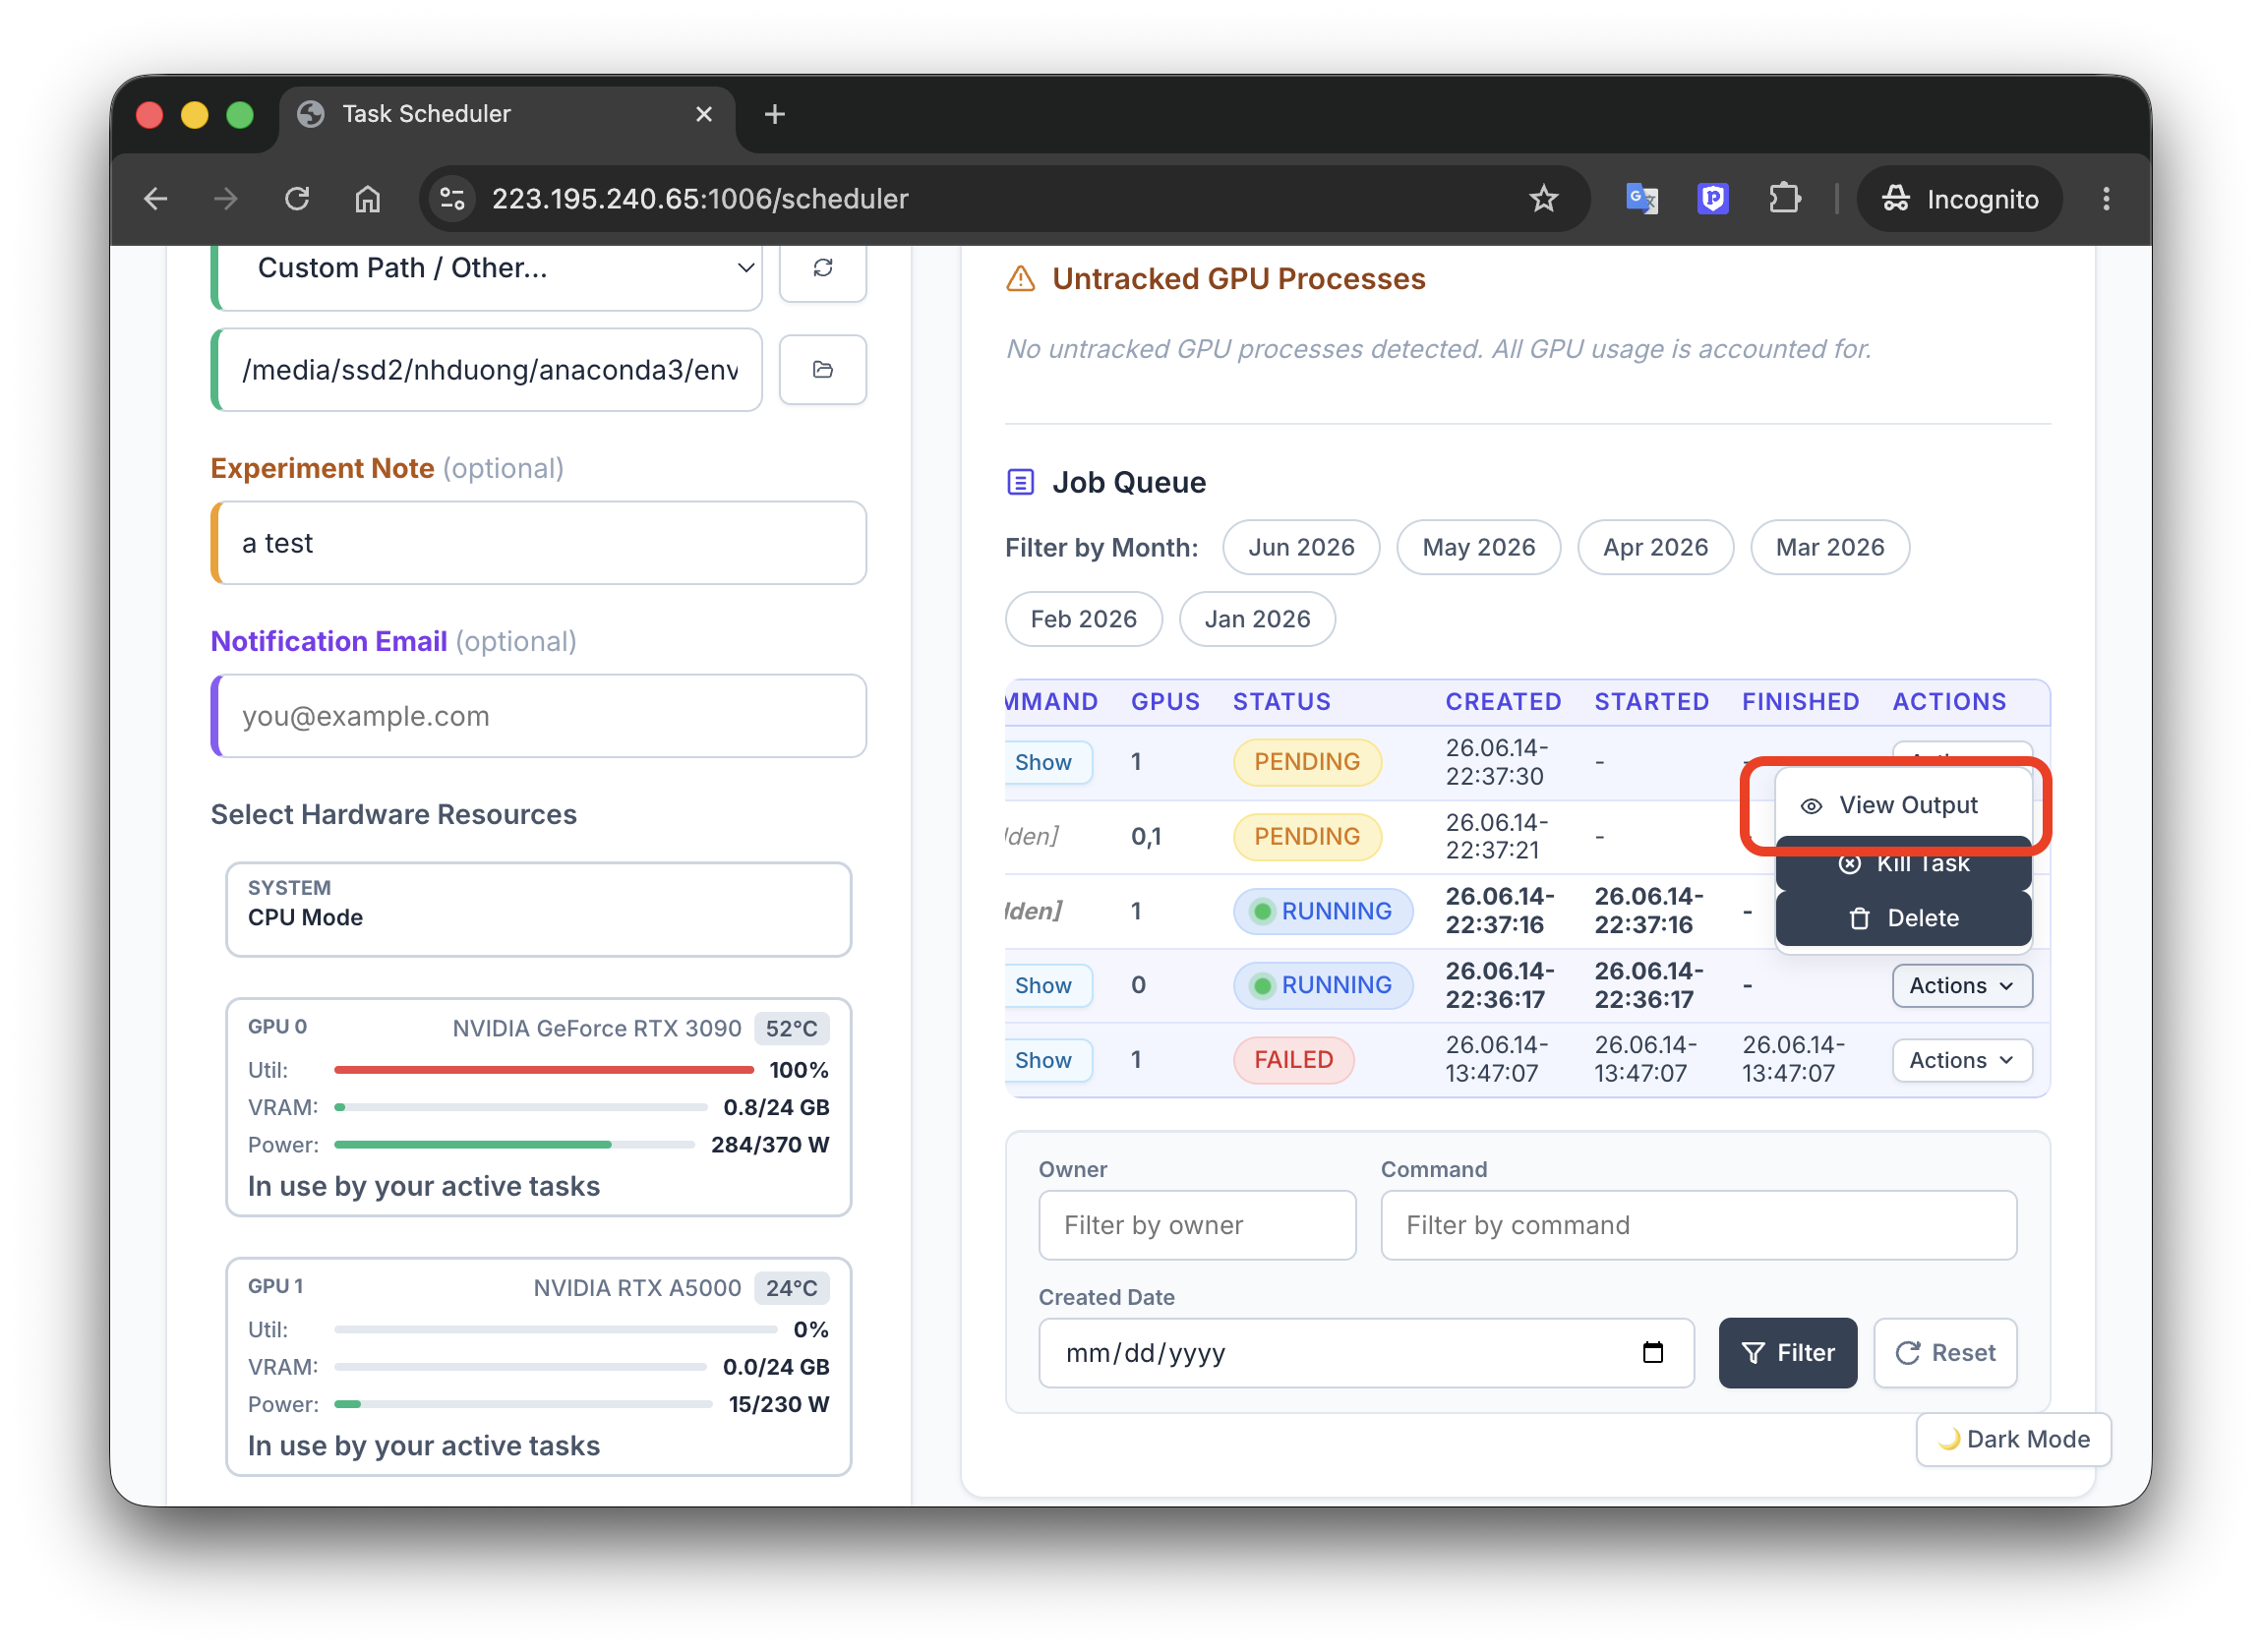
- Then a log viewer will pop up. Here you can monitor GPUs, etc. and your job’s output in real time
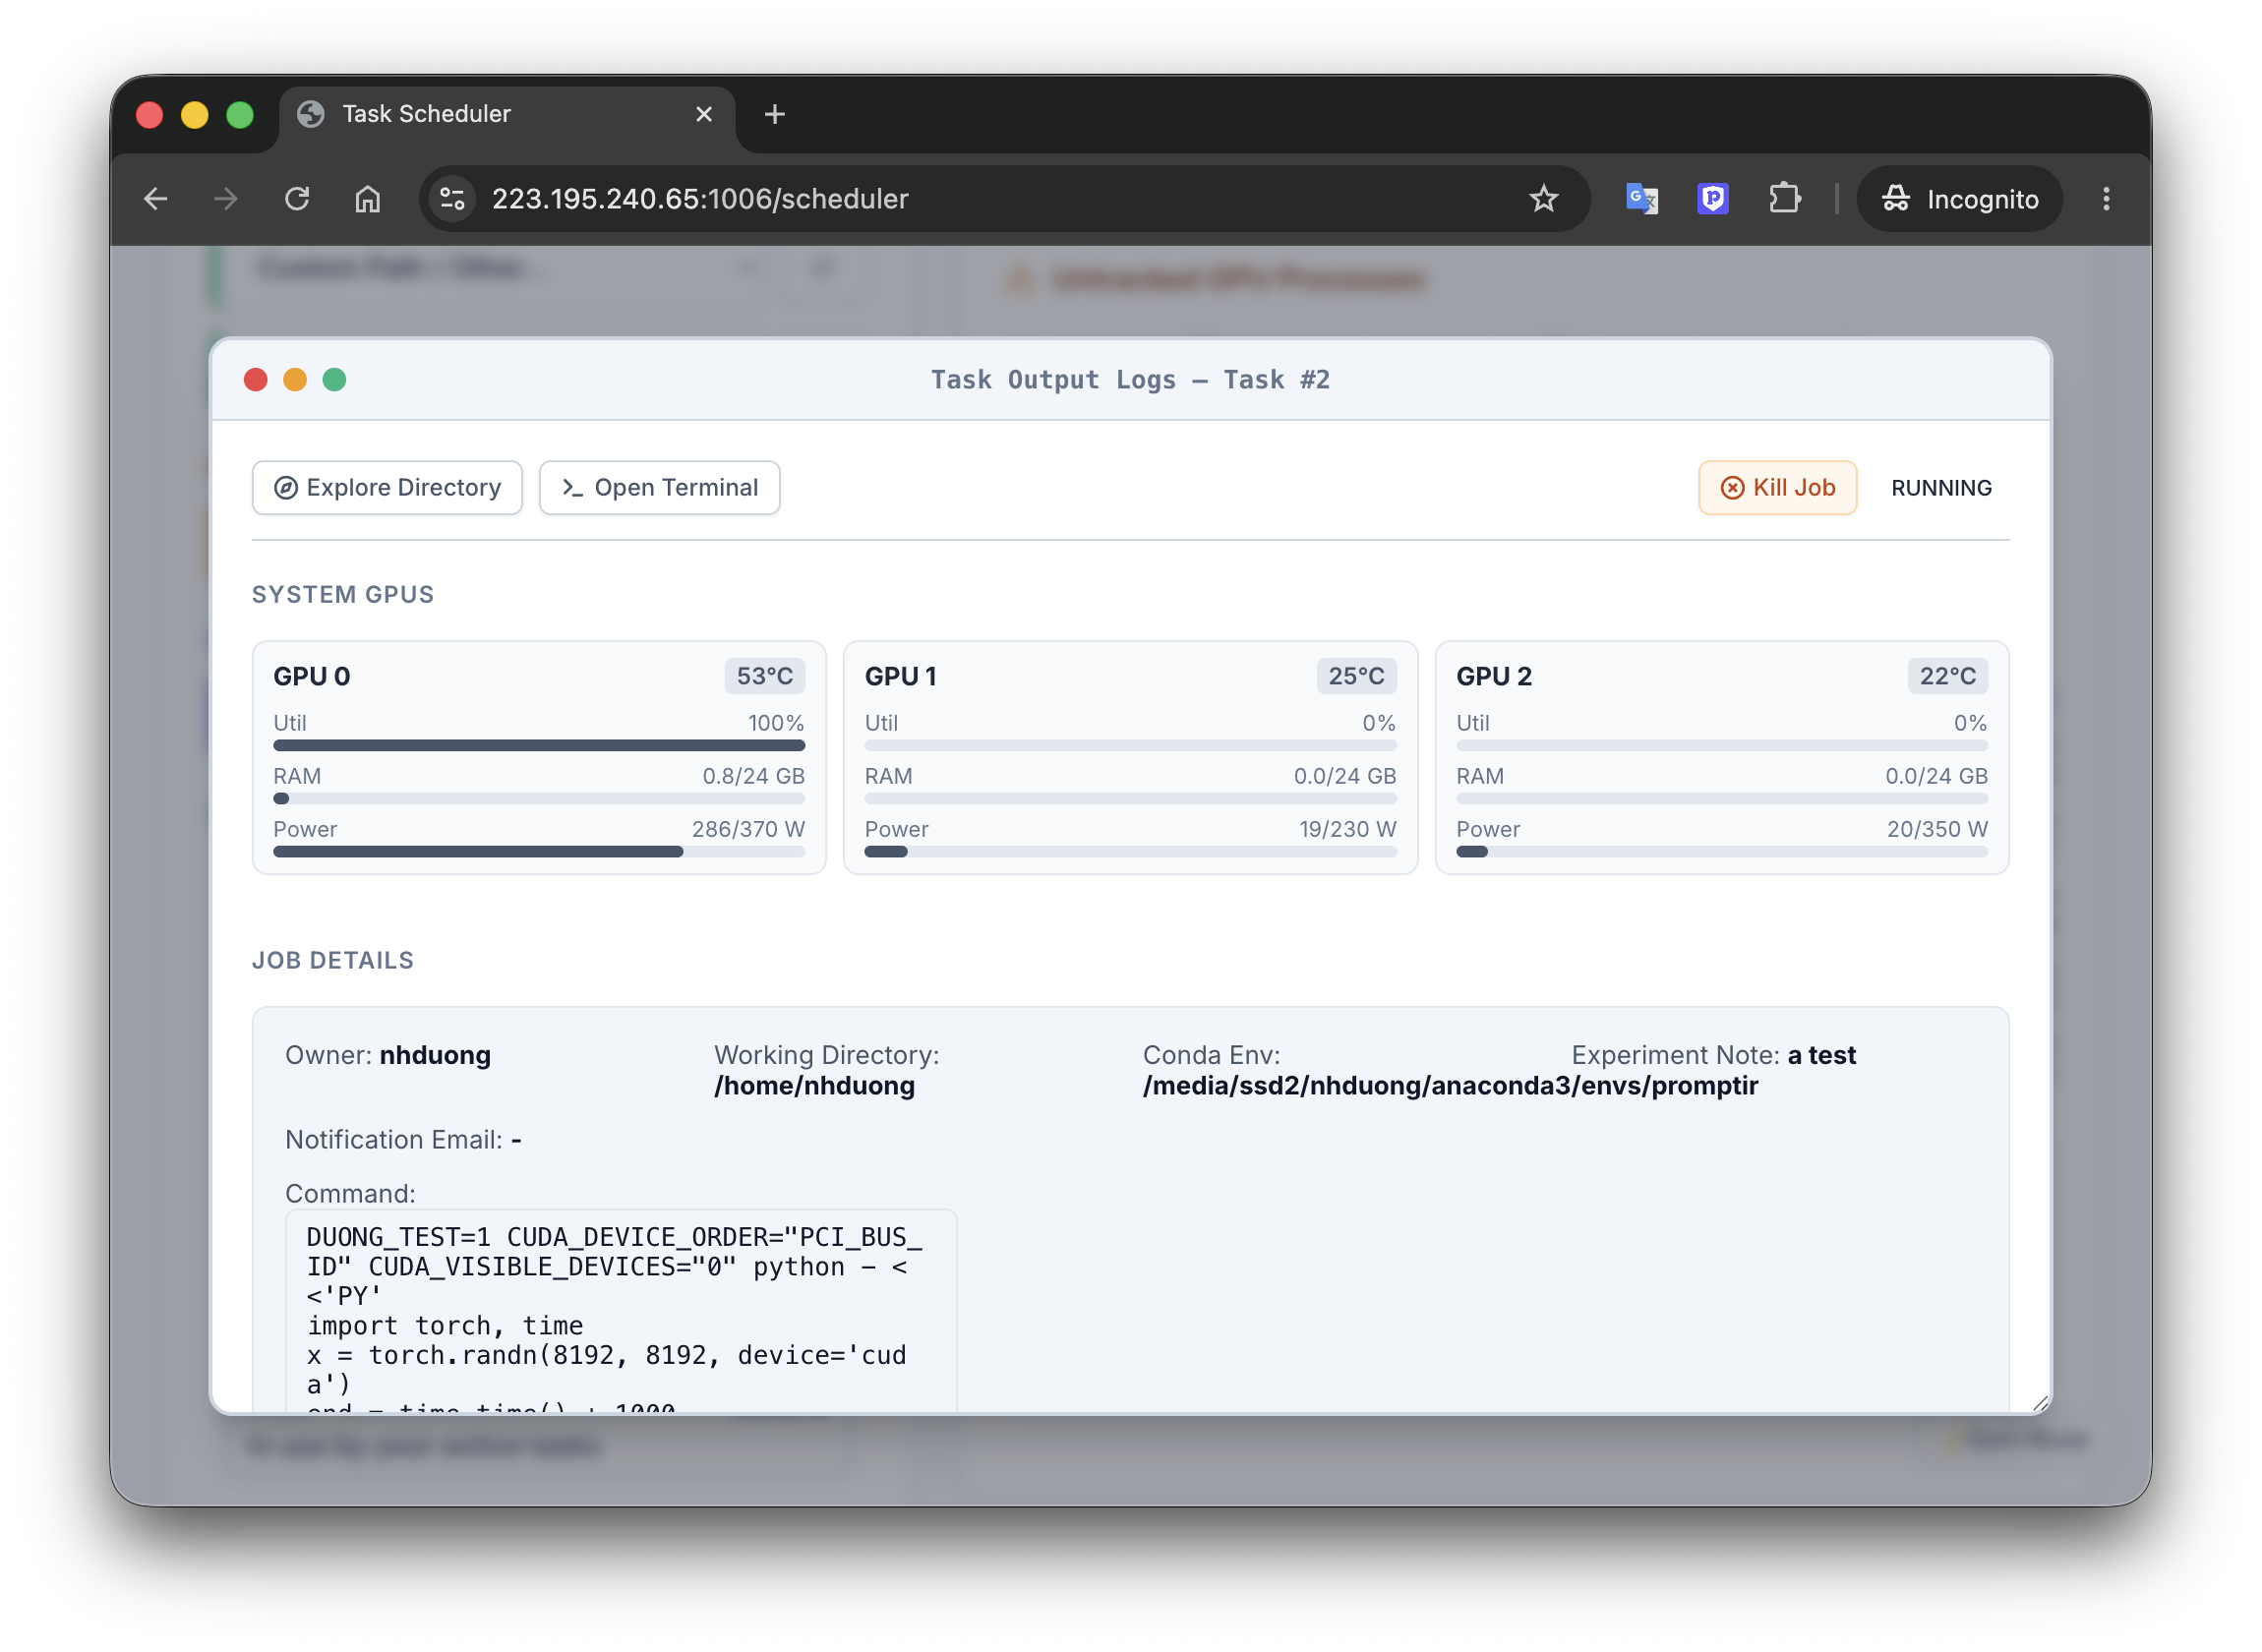
- In this window, in addition to ‘View Log’, you can also
KillandDeleteyou jobs. - If you job is killed or finished, an email notification will be sent to you if you have provided an email address
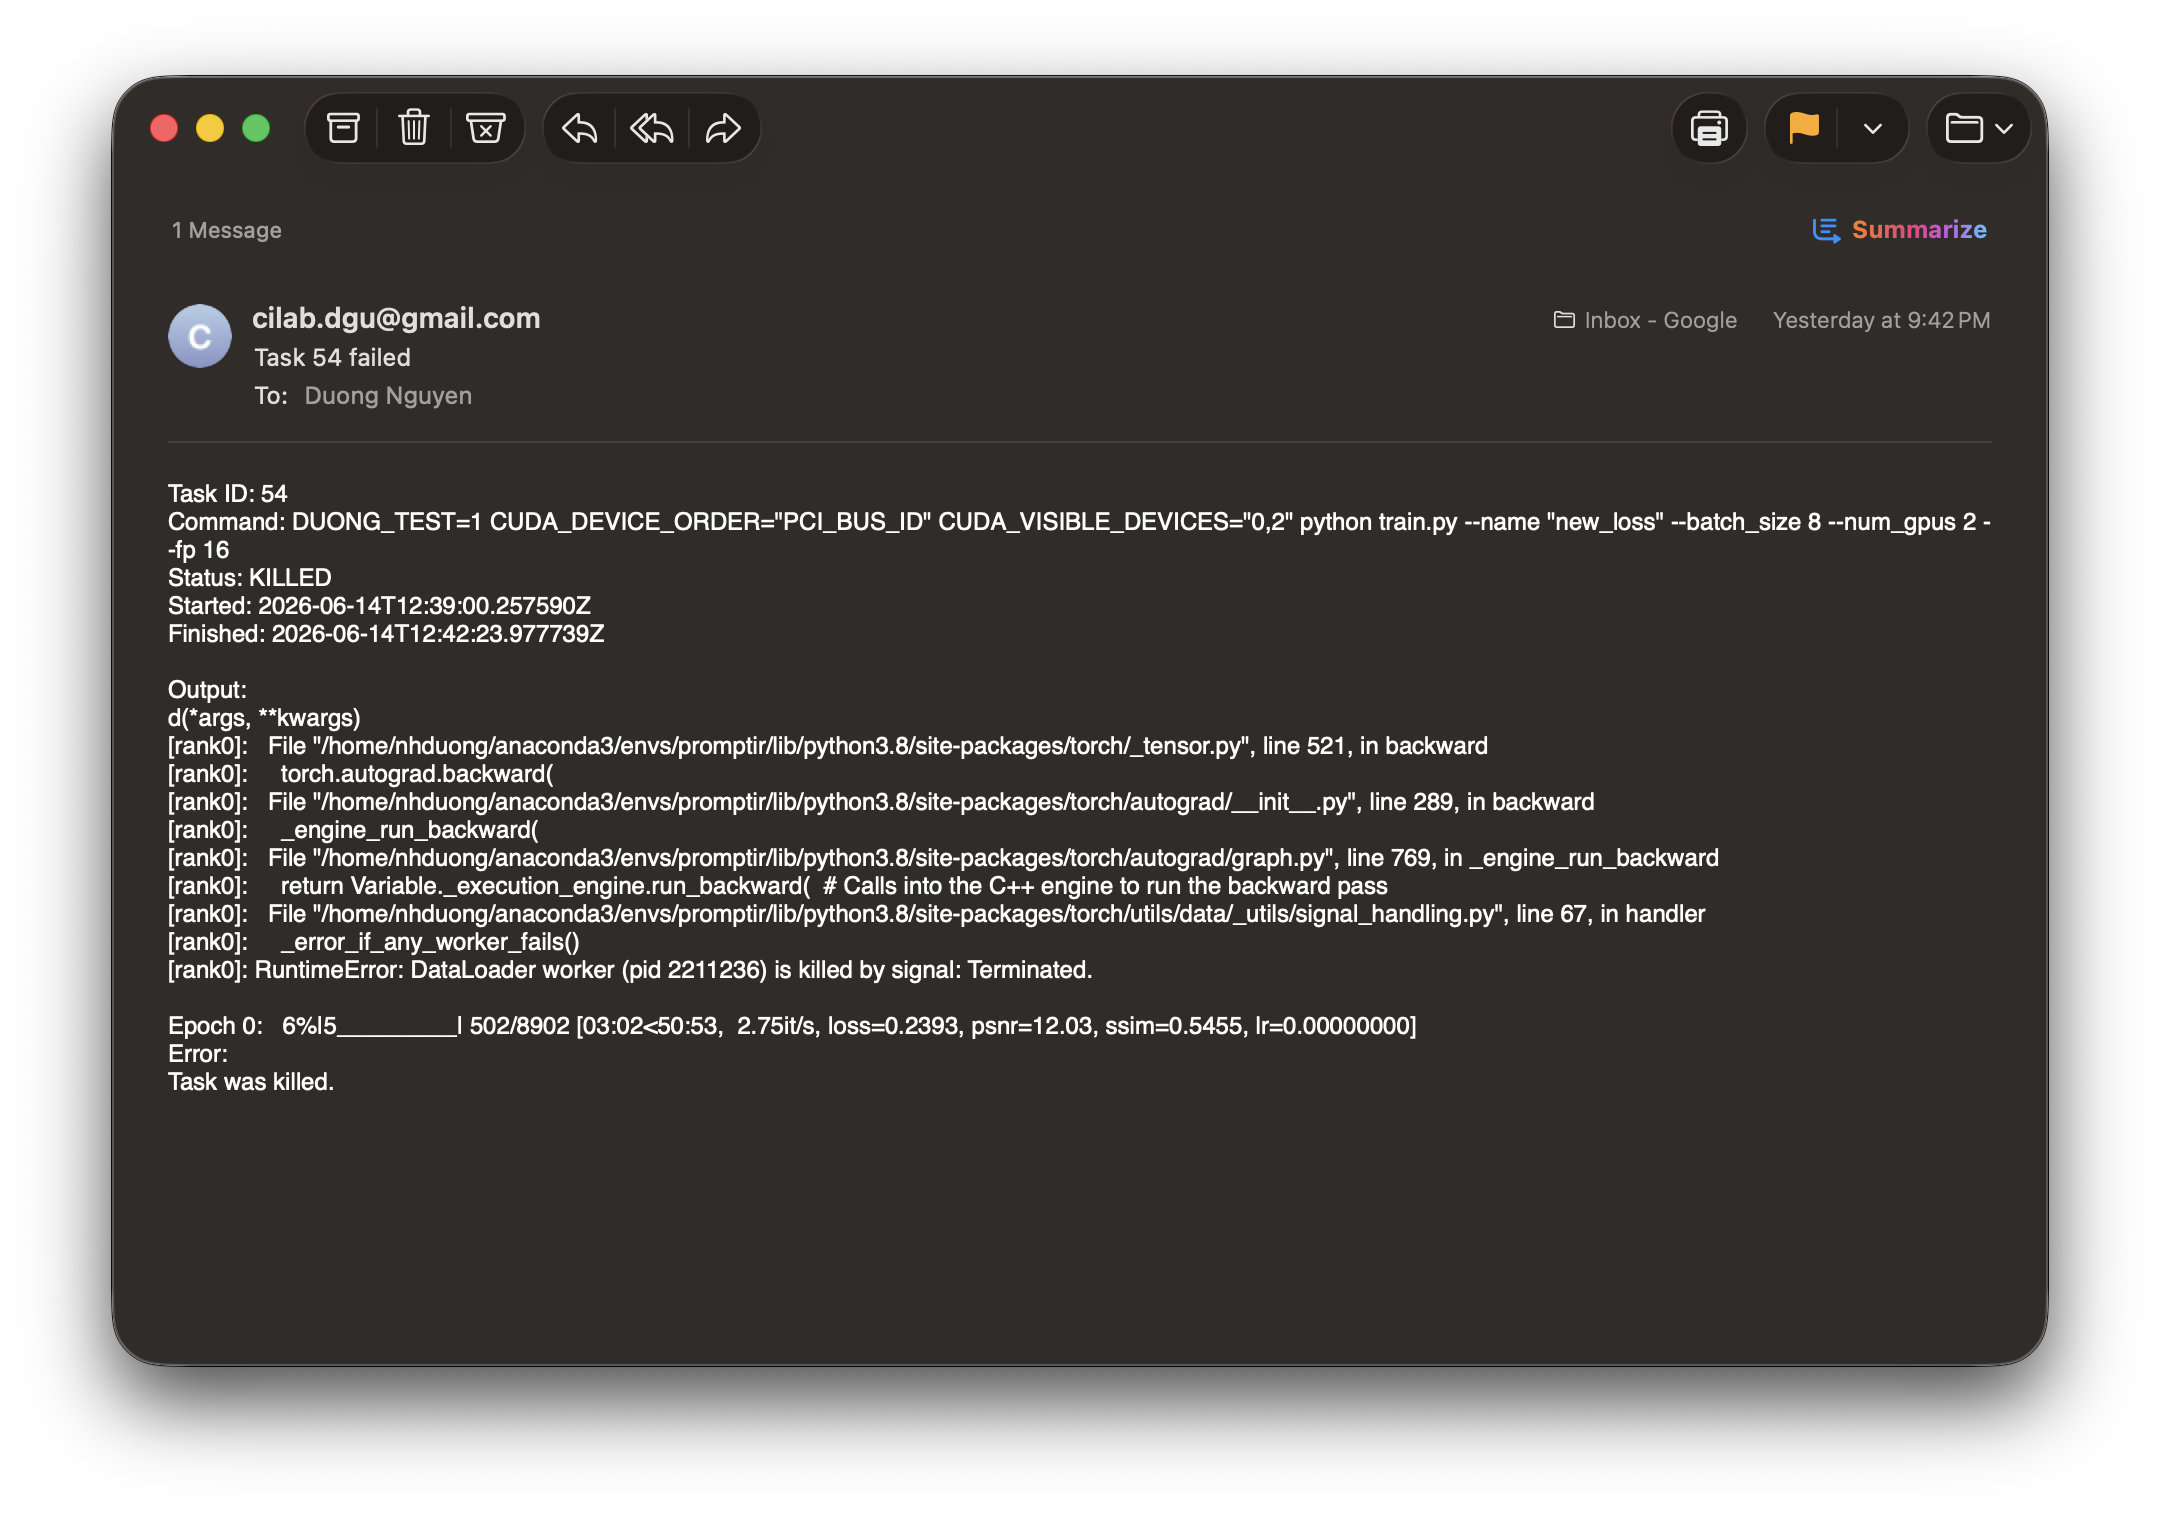
- To inspect what happened to your job, you can click
Activity Logson the top left corner
- Click on the
In addition to the
Job Scheduler, you can also use theFile ExplorerandTerminal. I believe you can figure out how to use them by yourself and hopefully they will be useful for you. If you have any questions about the GPU scheduler, please ask questions in our KakaoTalk group.
Data Transfer 🚚
Secure File Transfer Protocol (SFTP) is required for transferring data between your PCs, workstations and NAS. There are several SFTP clients available for you to choose from, such as FileZilla, Bitvise, etc. For command line based software, sshfs, rclone, etc. are also available. In this tutorial, we will use FileZilla, sshfs, and rclone as examples.
FileZilla
FileZilla is a free software and available for Windows, macOS, and Linux. It is easy to use and provides a user-friendly interface for transferring files between your PCs, workstations and NAS.
Here are the steps to make a connection to workstations/NAS via FileZilla:Download and install FileZilla
Head to
File -> Site Manager -> New SiteFill in the following information:
- Protocol: SFTP - SSH File Transfer Protocol
- Host: workstation/NAS’s IP address
- Port: 1004
- Logon Type: Normal
- User: your_username
- Password: your_password
Click
Connect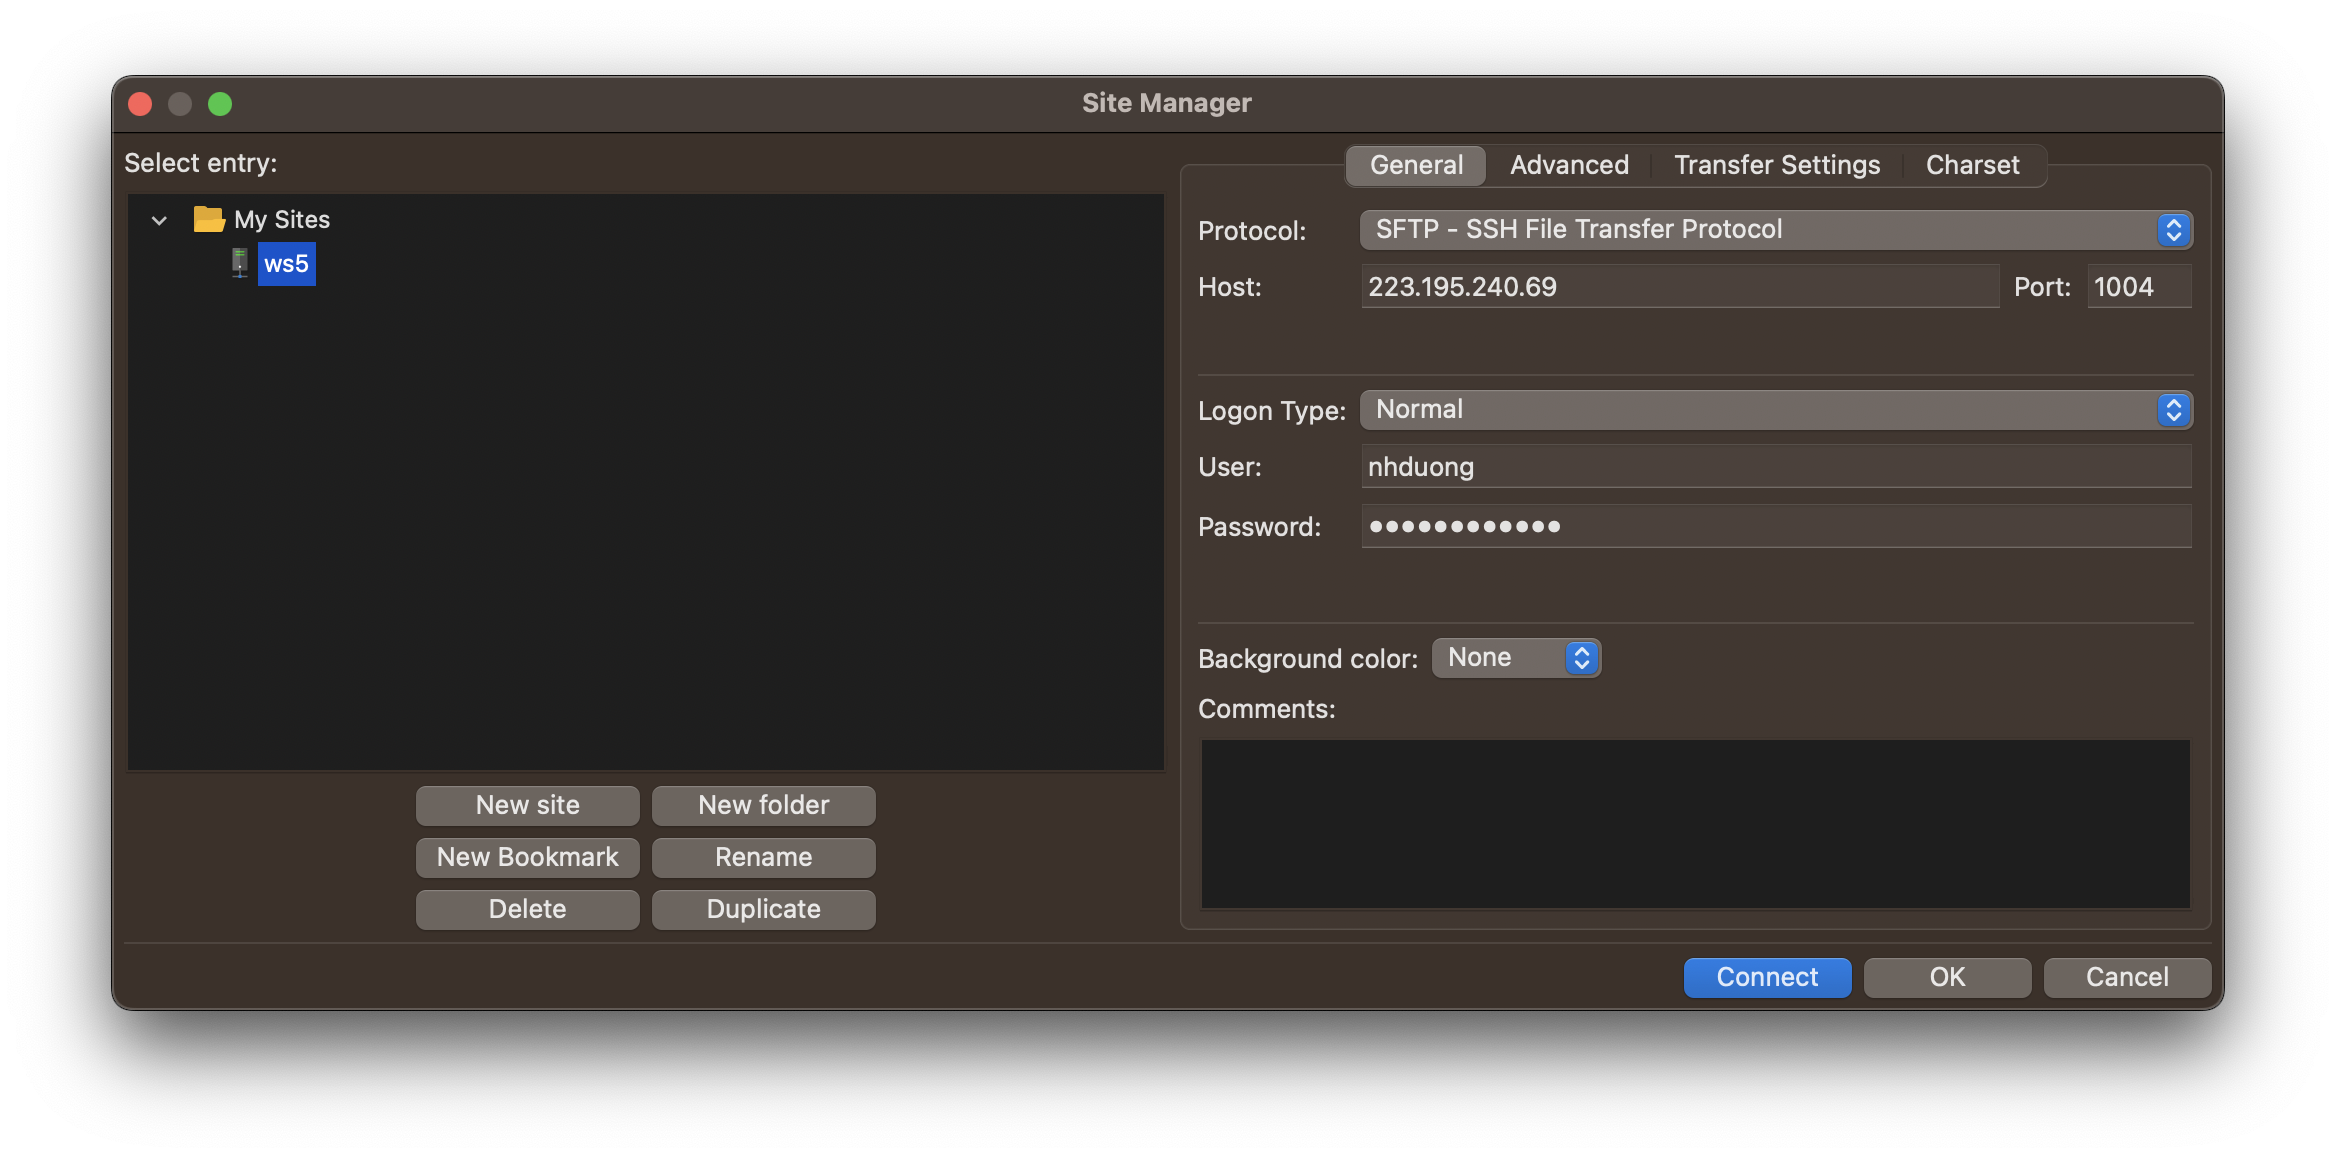
For the first time you connect to a workstation/NAS, you will be asked to verify the server’s fingerprint. Click on the
OKbutton to continue.Note that the above steps are for the first time you connect to a workstation/NAS. After that, you can simply select a server and click on the
Connectbutton to connect to the server.
In the figure below, the left panel is for your local machine and the right panel is for the remote server (workstation/NAS). You can drag and drop files between these two panels to transfer data. To visually inspect the data, you can right-click on a file and select
View -> Editto open it.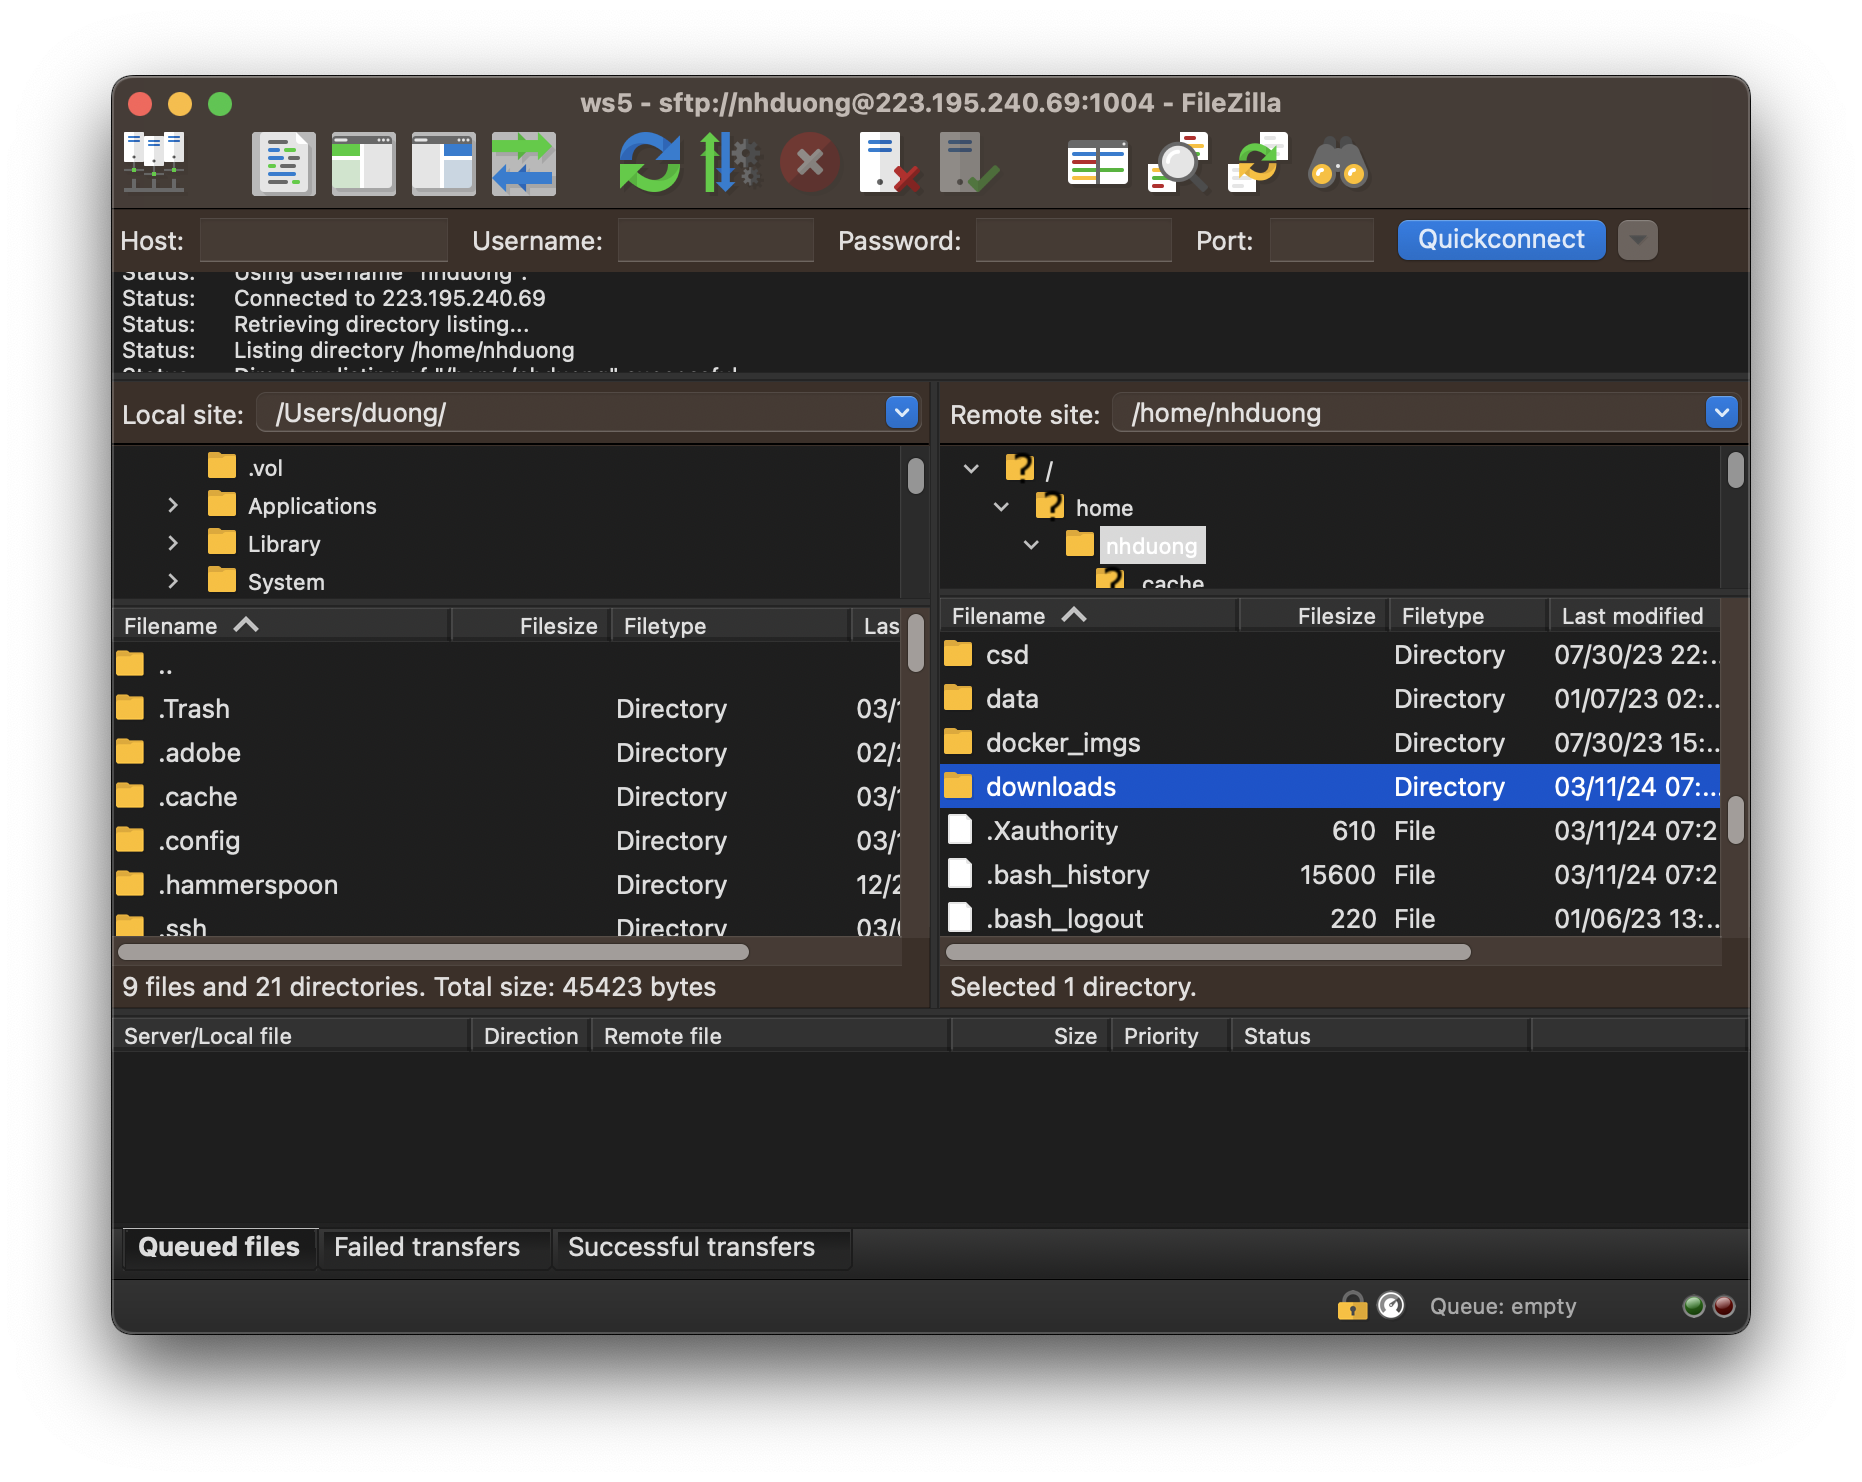
sshfssshfsis a command line based software that allows you to mount a remote file system via SFTP. In other words, you can access a folder on the workstation/NAS via a local folder on your PCs. To install sshfs, follow the instructions for Linux, Windows, and macOS.To mount a workstation/NAS folder on your local machine, follow these steps:
Open a terminal on your local machine.
Run the following command to mount a remote folder on your machine:
sshfs your_username@remote_IP_address:/your_username/remote_folder -p 1004 local_folderIn addition to your PCs, the above command can also be run on a workstation! This way, your workstation can access a NAS folder or another workstation’s folder.
You will need to execute the above command every time you restart your PCs or workstations.
rclonercloneis another command line based software that allows you to transfer data between your PCs, workstations and NAS. It supports various cloud storage providers, including Google Drive, Dropbox, etc. To set uprcloneon a local machine or a workstation, follow these steps:- Download rclone-version-os.zip based on your operating system
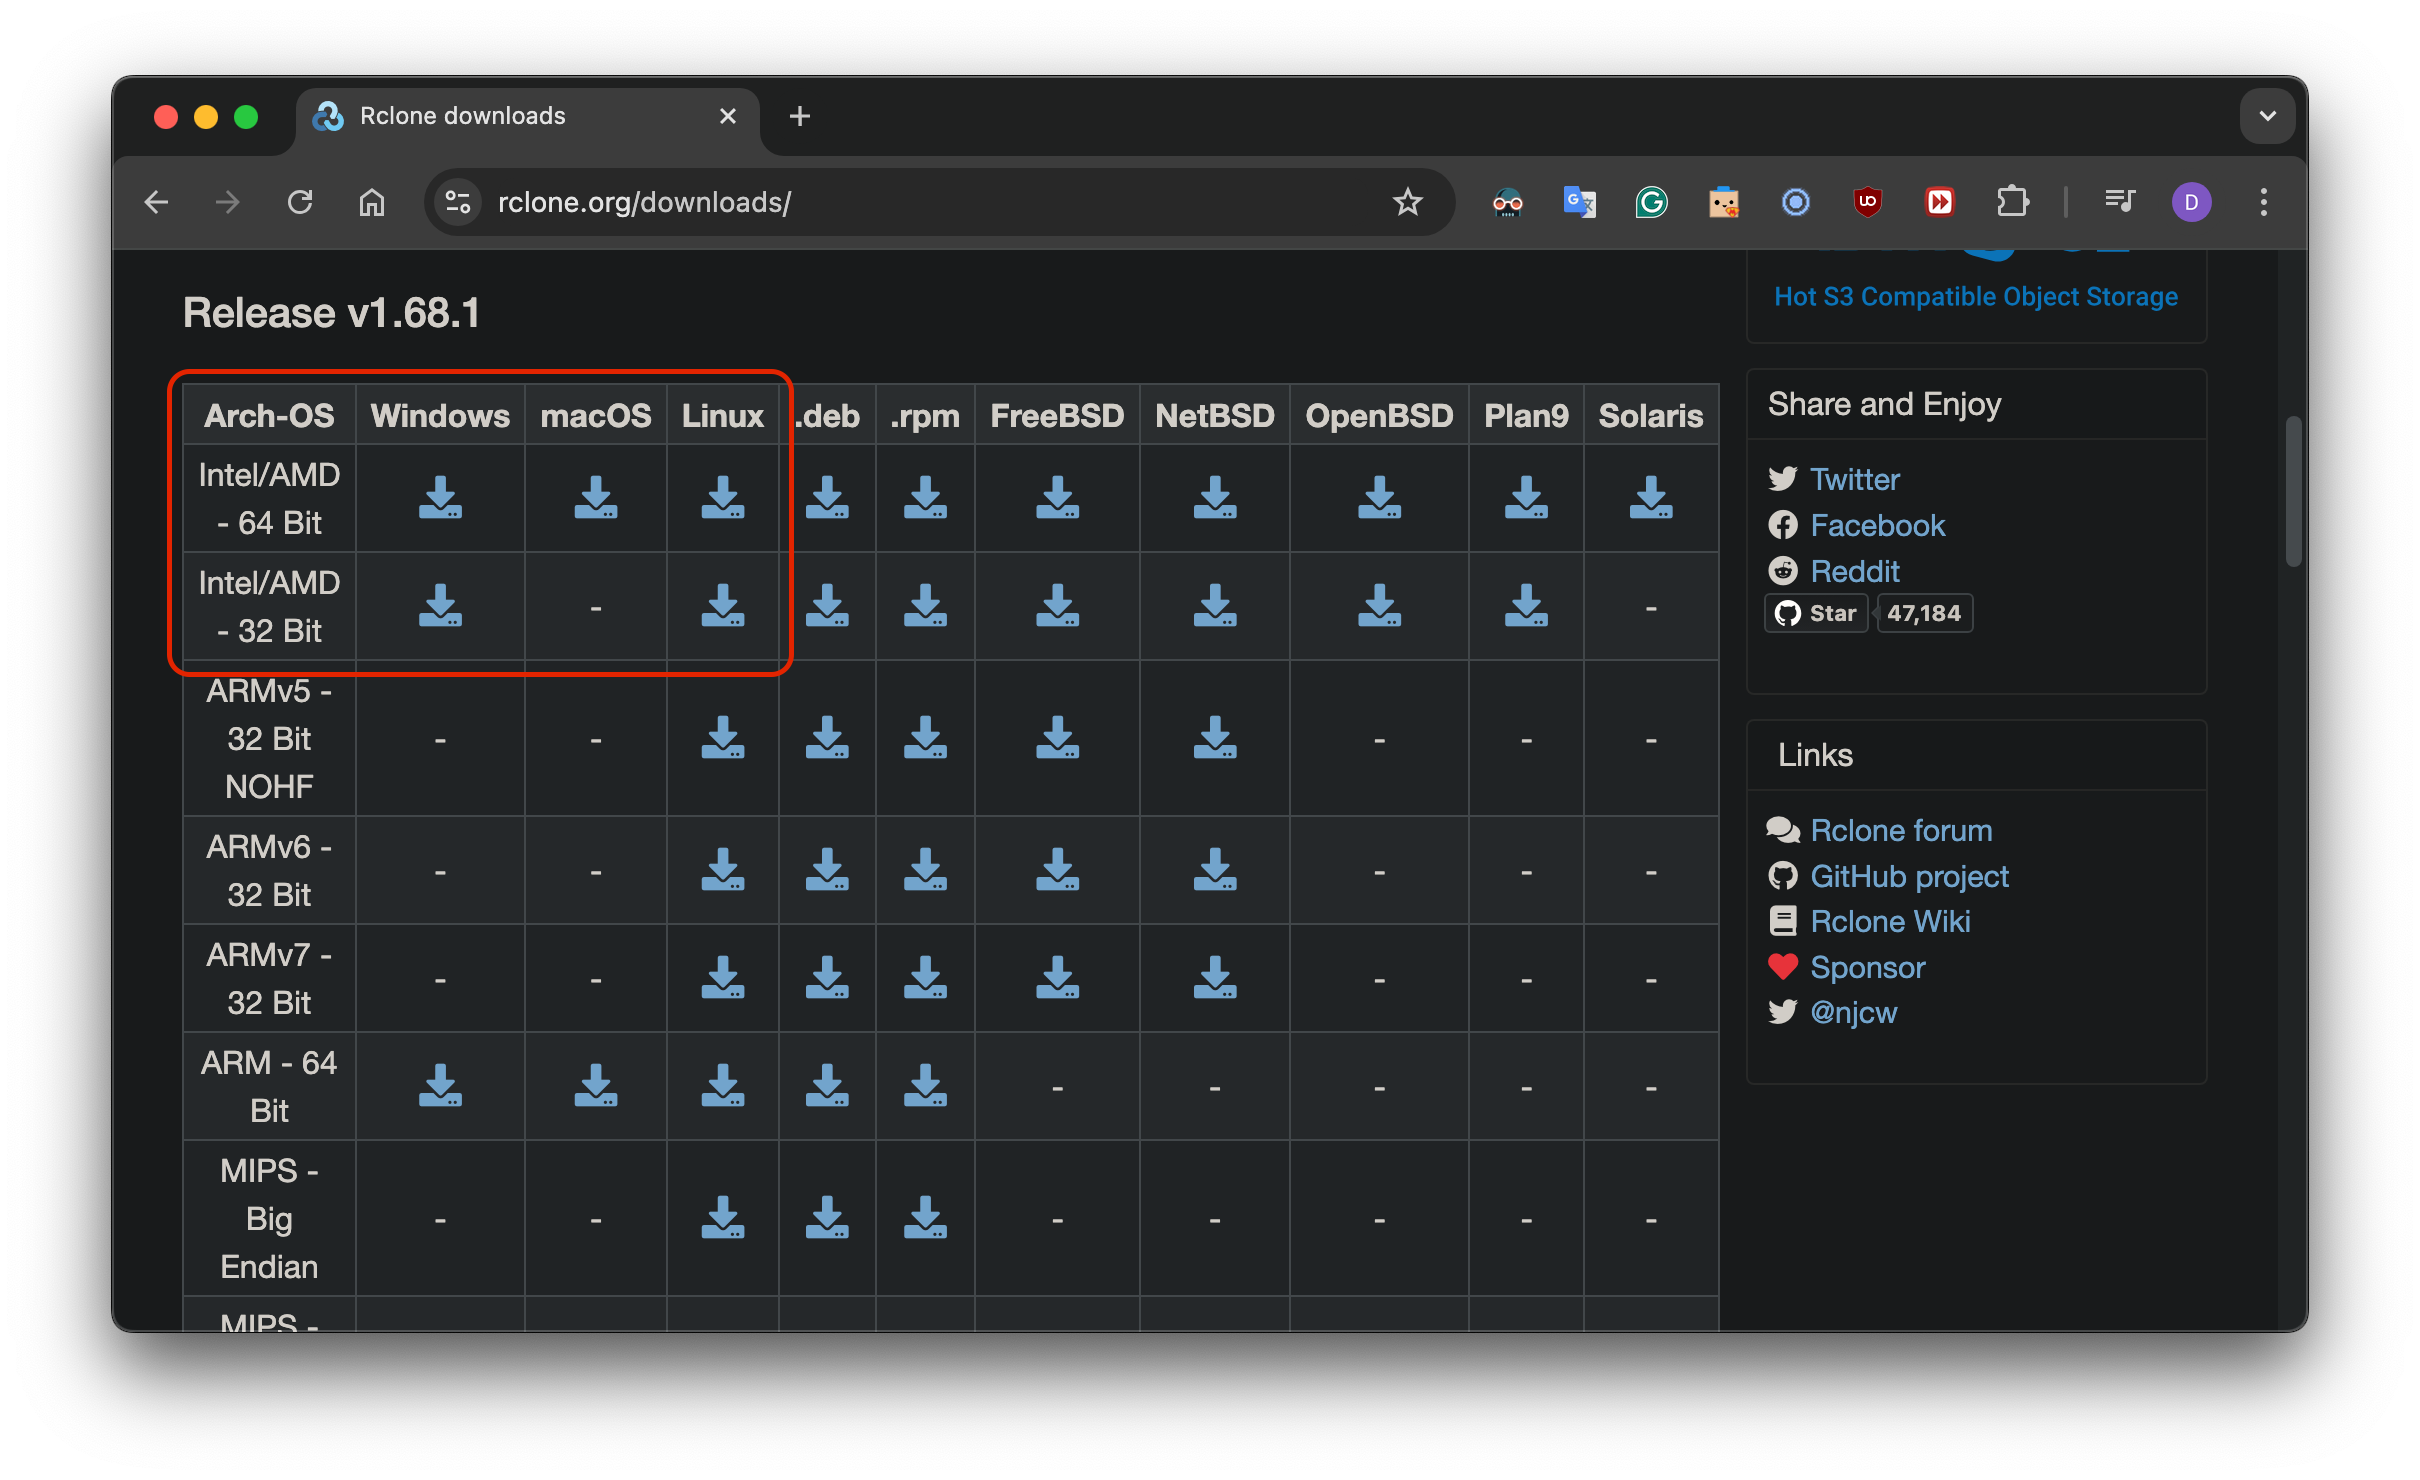
- Unzip the downloaded file to a folder, for example,
/home/user/rclone - Run the following command to set up a connection to a workstation/NAS:
cd /home/user/rclone ./rclone config- Follow the instructions to set up a new connection:
- Enter
nto create a new remote - Enter the following information:
- name: type any name for the connection, for example,
nas - storage: type
sftpfor secure file transfer protocol - host: type the workstation/NAS’s IP address
- user: type your username
- port: type
1004 - You will be asked to enter your password
SSH password, leave blank to use ssh-agent.... Typeyand pressEnter. After that, enter your password and pressEnter - For the rest of the questions, you can press
Enterto use the default values until you see the main menu again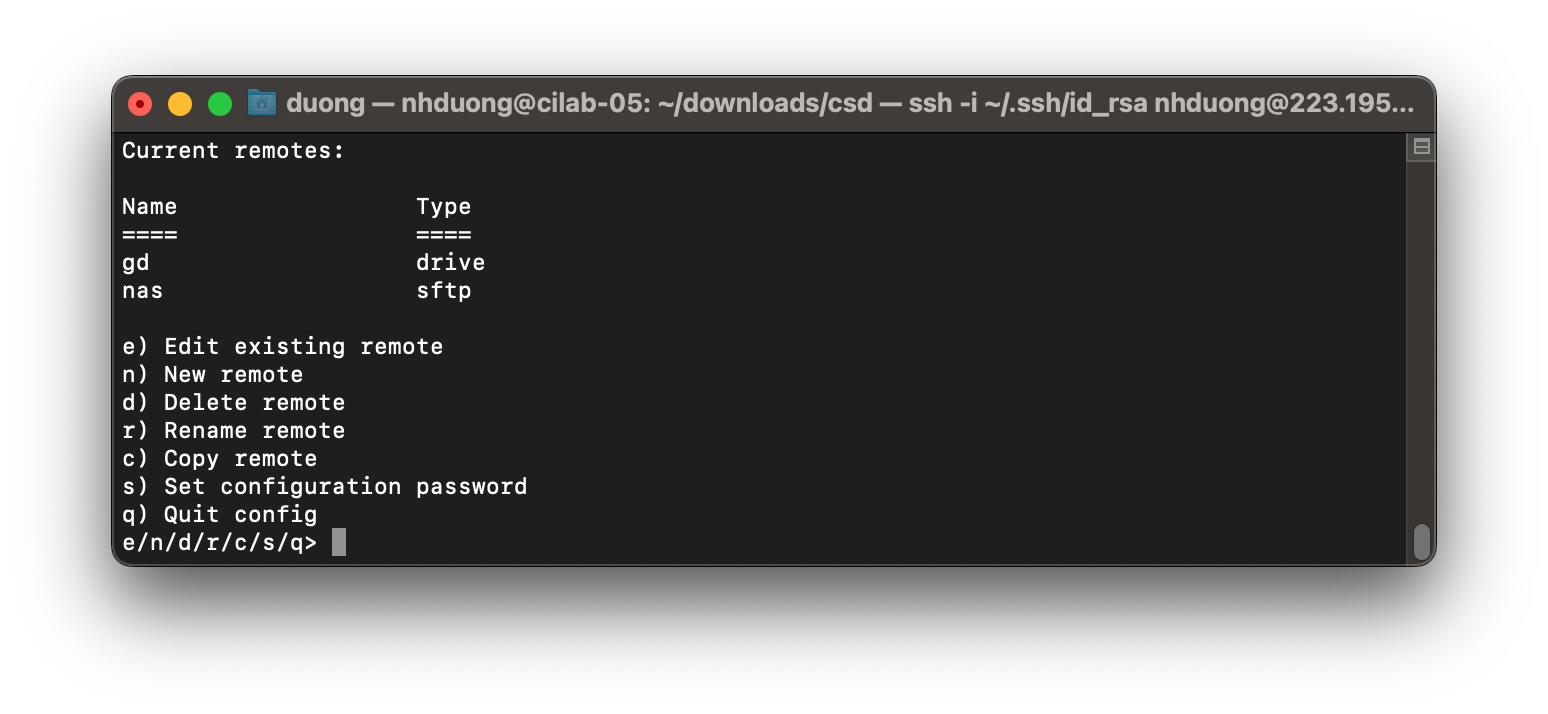
- From the figure above, you can see that the connection
nashas been successfully set up. Let’s test the connection by running the following command:
./rclone lsd nas:/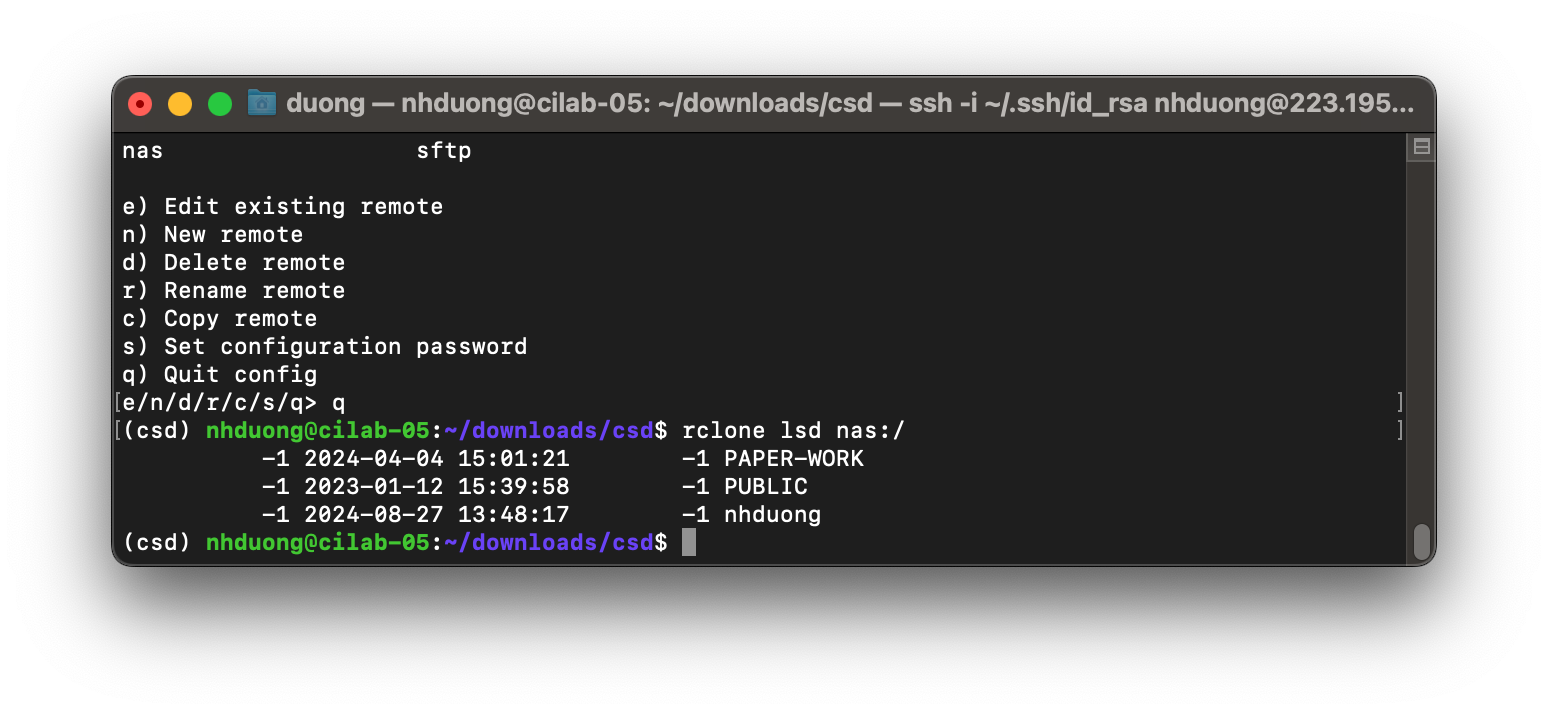
- If you see a list of folders on the workstation/NAS, the connection is successful. You can now transfer data between your PCs, workstations and NAS using
rclonewith the following command:
or simply./rclone copy -P --fast-list --drive-chunk-size=256M --multi-thread-streams=16 --transfers=4 --multi-thread-cutoff=256 local_folder nas:/remote_folderThere are many other features of./rclone copy -P local_folder nas:/remote_folderrclonethat you might want to explore. Execute./rclone --helpor visit Rclone Commands for more information. - name: type any name for the connection, for example,
- Enter
- Download rclone-version-os.zip based on your operating system